- On the Administrator Panel, in the Courses section, select Courses.
- Point to Create Course and select New. You can merge existing sections, allowing instructors to manage multiple sections of the same course through a single master course. ...
- Provide the course information. This table describes the available fields. [r] indicates a required field. ...
- Select Submit. Blackboard Learn creates the course but does not add instructors, students, or other users to it. To learn more about adding users, including instructors, see Managing Enrollments.
Create a course
- On the Administrator Panel, in the Courses section, select Courses.
- Point to Create Course and select New. You can merge existing sections, allowing instructors to manage multiple sections of the same course through a single master course. ...
- Provide the course information. ...
- Select Submit.
How to create and add a course on Blackboard?
Create a course. On the Administrator Panel, in the Courses section, select Courses. Point to Create Course and select New. You can merge existing sections, allowing instructors to manage multiple sections of the same course through a single master course. To learn more, see How to Merge and Separate Child Courses.
How to put your course on Blackboard?
What you'll learn
- Create a course on the Blackboard platform
- Customizie your Blackboard page
- Upload documents to your Blackboard page
- Put your assignments on the Discussion Board
- Create tests in Blackboard
How to make a course available?
These courses will be available on Platzi and will seek to train thousands of creators through five courses, live sessions with experts, and access to a community of creatives. This will allow creators to develop Spark AR content such as filters ...
How to add someone into your blackboard course?
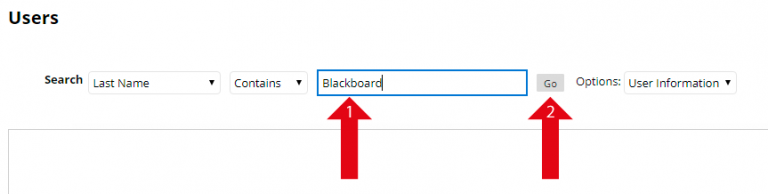
To manually enroll as user into a Blackboard Learn course:
- Enter the course you want to enroll a non-registered user. ...
- Navigate to: Control Panel > Users and Groups > Users.
- Click the "Find Users to Enroll" button.
- On the "Add Enrollments:" screen, click the "Browse..." button. ...
- Locate the user using the Search toolbar on the page. ...
- Select the check box next to the user, then click the "Submit" button.
How to edit a course page?
To edit the title and settings of a course module page, access the module page title's menu and select Edit. If you change the title, the change does not show on the course menu. You can also edit the title on the course menu for consistency. If you change the title of the course module page on the course menu, the title is changed in the course menu and on the page itself.
How to add modules to a course?
On the course module page, select Add Module. On the Add Module page, you can search by keyword or browse by category to find modules. Select More to view how a module will appear on the page.
What is a course module?
Course module pages contain details about new content and due dates for the course you're in. Information is presented in boxes called modules, such as My Announcements, My Tasks, To Do, and What's New. The system generates the information in each module. You can't add your own content to module pages.
What is the home page of a course?
The Home Page is often the default course entry point and it's the first page students see when they enter your course.
Where is the link to the new module page?
After you submit, a link to the new module page appears at the bottom of the course menu. You can drag it to a new location or use the keyboard accessible reordering tool.
How to change how content appears in a module?
Select the Manage Settings icon to change how the content appears. For example, you can select how many days of announcements appear in a module. Select the X to remove a module. Content reported in the module isn't removed. Not all modules have settings you can change.
How to make a course available in more than one institution?
To make a course available in more than one institution, select Find Node. Select whether to search for the node by Name, Description, or Identifier. Select a search condition from the menu: Contains, Equal To, Starts With, or Not Blank. Provide the search term and select Go.
How to limit course availability?
To limit course availability to a specific number of days after a student enrolls, select Days from the Date of Enrollment and provide the number of days. Course View Options. Choose a course view option.
What is a term and course start/end date?
Both term and course start/end dates are used to organize courses into a timeline on the Courses page for instructors and students. When you make a course unavailable, students can see it in their course lists, but can't access it. Instructors see unavailable courses in their course lists and can access them.
How many characters can you have in a course name?
For example, you can have three courses titled "Beginning Composition." You can change course names at any time. The maximum length is 255 characters. This field is searchable.
When can instructors open courses?
Instructors can open courses when they're ready for students to participate. Duration. This defines the time period the course will remain available. Original Course View: Available courses are open to students to access or self-enroll in if a course allows self-enrollment.
Can you change course IDs after creating them?
You can use numbers, letters, hyphens (-), underscores (_), and periods (.). All other characters, including spaces, are prohibited. You can't change course IDs after you create them.
Do you need a course ID for each course?
Each new course you create must have a Course Name and a Course ID. Further options are detailed in the following table.
How to make a course unavailable on Blackboard?
To make the course available, open the course's menu and select Make Available. To make a course unavailable, open the course's menu and select Make Unavailable.
What are the two properties of Blackboard Learn?
When you create a course, Blackboard Learn requires only two course properties: a course name and a course ID . However, several other course properties control important aspects of courses, such as when they're available, whether guest users are permitted, and where the course appears in the course catalog.
How to enable course structure?
On the Administrator Panel in the Courses section, select Course Settings. On the Course Settings page, select Course Menu and Structures. On the Course Menu and Structures page, select the check box for Enable Course Structures. To disable them, clear the check box.
How to disable Quick Setup Guide?
On the Quick Setup Guide page, select the check box for Do not show the Quick Setup Guide when entering a course to disable it. To enable it, clear the check box .
How to view child courses?
Child courses have limited options in the menu and need to be managed from their associated master courses. On the Administrator Panel in the Courses section, select Courses. Search for a course. On the Courses page, open the menu and select Edit.
What does "remove master enrollment" mean?
Remove Master Enrollments removes any enrollments that were added to the master course when the child course was originally merged with it. Choose this option if you don't want users enrolled in this course to remain enrolled in the master course. For example, choose this option if the course you want separated was accidentally merged into the set.
What happens when you merge a child course with a master course?
Upon being merged, all enrollments in the child course are replicated in the master course, and any future enrollment changes in the child course are also synchronized automatically with the master course. Duplicate student enrollments are reported and ignored. Users in other roles, such as Grader, Teaching Assistant, or Guest, are assigned roles based on the last time they're added to the master course.
How to add a file to a course?
Go to the course area where you want to add the file. In the Build Content list, select File.
Where are my files saved in Course Files?
Files you upload with the Browse My Computer function are saved in the top-level folder in Course Files. You don't have the option to select a different folder when you upload a file. By default, all enrolled users are granted read permission for files you upload to your course this way.
How to upload files to hot spot?
Drag files from your computer to the "hot spot" in the Attach Files area. If your browser allows, you can also drag a folder of files. The files will upload individually.
Can you drag files to upload on Blackboard?
You won’t be able to drag files to upload if your institution uses an older version of Blackboard Learn.
Can you edit a lesson without uploading it?
Advantage: You can edit any part of the lesson's content and overwrite just the edited file or files without removing and uploading a new zipped file. All links remain intact in your course.
Can you add files to a course file?
You can add files and folders to Course Files in multiple ways, including when you create course content .
Can you upload multiple files to a course?
You can upload a single file, multiple files, or one or more folders to Course Files. The contents of folders will be uploaded and appear individually in the upload list. After you upload, you can move them to other folders as needed.
How many users can you enroll in Blackboard?
You can enroll as many as 500 users to courses at one time with a batch file. If the batch file doesn't include a Primary Institution Role attribute for a user, Blackboard Learn assigns the default course role of Student.
How to see who enrolled in a course?
On the Courses page, open the course's menu and select Enrollments. The list of enrolled users appears.
How to enroll multiple users in a course?
Enroll users in a course. If you want to enroll multiple users in a course, enroll them in groups based on their course roles. You can select one role per set of users. For example, if a course has one or more instructors, enroll them first. Then, move on to students. Optionally, you can enroll all users with a role of Student ...
What happens when you merge a course into a master course?
When you merge a course into a single master course, its students are enrolled automatically in the merged master course. However, when students enter the course, they'll see only the course ID of the child course they were originally enrolled in. To learn more about merging courses, see Merge and Separate Courses.
Can you override enrollments?
If you have students who need to access a course outside of the normal term, you can override their enrollments. They'll have access to the course until the date you set.
Can you restore a course after you remove it?
You can't automatically restore users to courses after you remove them. However, you can enroll users again.
Can you change a user's role in a course?
You can change a user's role in a course at any time. For example, if an instructor needs an additional assistant during the term, you can change a user's role from Student to Teaching Assistant for that course.
How to add a syllabus to a folder?
In a content area or folder, select Build Content to access the menu and select Syllabus. On the Add Syllabus page, type a name and select the Use Existing File option.
How to use the options in the editor?
You can use the options in the editor to type a description, add images, and format the text. Select the appropriate options for availability, tracking, and display dates . Display dates don't affect a syllabus's availability, only when it appears.
What are the sections in the syllabus?
On the Syllabus Builder page, three sections appear by default: Description, Learning Objectives, and Required Materials. You can edit the section headings. Type instructions or a description in each box. You can format the text with the options in the editor.
Can you use the syllabus builder?
You can use the syllabus builder to create a syllabus in a modular format. You can also specify the design and add lesson information.
Can you upload a syllabus file?
You can upload an existing syllabus file and students select the link to open it. Or, you can use the syllabus builder. The syllabus will appear as a standalone item in the content list. Your institution controls if this tool is available.
Popular Posts:
- 1. which institute is best for medical transcription course in bangalore
- 2. what is financial management course
- 3. what is the best lsat prep course to take
- 4. how to write a college course curriculum
- 5. how long is billing and coding course
- 6. how long is medical assistant course
- 7. what is pmp training course
- 8. what is a course management system
- 9. what is business management course
- 10. how long is hvac course