
0:00
0:49
Okay go to the Help button and ask your instructor a question select the course that you would likeMoreOkay go to the Help button and ask your instructor a question select the course that you would like to unenroll.
What does it mean when a Canvas course is not published?
When first created, Canvas courses are not published, meaning that they are unavailable for students to view. Instructors can utilize the time when a course is initially not published to set up their course for the semester. It is also possible for instructors to unpublish their course, which will prevent students from accessing the course.
Can a graded assessment be unpublished?
Once you have graded an assessment, your course cannot be unpublished.
Can you unpublish a course once it has been graded?
Note: Once your course contains a graded submission, you can no longer unpublish your course.
How to see what courses are on your dashboard?
Which courses display on your Dashboard when you log in can be managed by clicking the ‘Courses’ icon then selecting ‘All Courses’ . The stars on the left are the way you select which courses you want to see when you log in on the Dashboard.
Can you leave a copy of a course on a PC?
Do not leave copies of your courses on PC’s in public areas. There are sites on the web where someone could sell your course content and it’s nearly impossible to get those sites to remove your content once it is out there. Keep control of your content.
Can you delete a course without exporting?
It will probably be the one time you delete a course without exporting and saving a copy to your hard drive that will be “THE TIME” you realized that it contained some only copy of a file that was important. So take the few moments it takes to export a copy of this material to a safe place before proceeding to permanently delete this material.
Can you delete a master course?
You may permanently delete the manual Master course shells you created yourself. The operative word is ‘Permanently’
How to delete a course in Canvas?
To delete all course content from your Canvas course: 1 Navigate to the course with the content you wish to delete. 2 From the course navigation menu, select Settings. 3 In the "Settings" sidebar at the right, select Delete All Course Content. You will be prompted to confirm. To proceed, click Reset Course Content, or click Cancel to cancel. 4 If you selected Reset Course Content, a completely new course shell with a new ID (the number following "https://iu.instructure.com/courses/...") will be generated. All users previously enrolled in the course will remain enrolled.
When you reapply settings in Canvas, what happens?
When you reapply the settings in your Canvas course, the settings and navigation in your course will be replaced with those in the default template. Reapply settings before you start creating or importing course content. If you apply it afterward:
How to reapply IU?
To reapply the IU defaults: Navigate to the course with the content you wish to delete. From the course navigation menu, select Settings. In the "Settings" sidebar at the right, select Reapply Default Settings. Read the information in the pop-up window and click Submit to proceed or Cancel to cancel. If you clicked Submit, a template will be ...
How to reset a course?
Completely resetting your course is a two-step process. First, you'll delete the existing course content, and then you'll reapply the default settings for the course. You can opt to do either step without the other, but if you decide to do both, you should carry them out in the order specified below. Back to top.
What happens when you create a SIS in Canvas?
When new SIS and manually created courses are generated in Canvas, the course home page, navigation, and settings are automatically updated to reflect defaults established by Indiana University or your campus, school, or department (for more about course defaults, see Distribute templates to Canvas courses in your campus, school, or department ).
Can you overwrite a course syllabus?
You may overwrite your course syllabus or other content in your course with content in the default template. If you already created content in your course site, you may want to consider making a copy of your course before applying the template. If you made customizations to the settings or navigation of the course, you may need to reset them.
Closing Your Course
Canvas does not automatically close your course at the end of the term. Because each instructor is responsible for opening their course on their preferred date, they are also responsible for closing it. However, one year after the term has ended (according to the university calendar), OAT will conclude the term in Canvas.
Course Access After Closing
To access a concluded course, click the Courses menu and then click the "All Courses" link. The course will be found in the Past Enrollments area of your course list. Click on the course name to open it.
Allow Access for Incompletes
Incompletes present a special situation where only specific students need access to a course after the course end date. To do this, instructors create a special section of the course in Canvas.
Questions?
Contact [email protected] if you need assistance with any aspect of closing a course.
What does the slash on the view course notification mean?
When the bell on the View Course Notifications icon has a slash through it, that means the user has disabled notifications for this course and they will no longer receive emails about course activities.
What does the bell icon on the Course Notifications button mean?
A bell icon on the View Course Notifications button indicates that the user will receive notifications about the course.
How to send to another instructor on Canvas?
The "Send To..." option is accessed by clicking the Options kebob icon to the right of a content item's line in a module or course index page (e.g. Assignments or Discussions page).
How to invite other instructors to a Canvas sandbox?
This can be done by entering the instructor's UWGB email address in the + People menu of the sandbox course's People page. Full instructions for this step can be found in this Canvas Instructor guide page on adding users to a course. Please read the section below for information on which role to select when adding the other instructor to your sandbox course.
How to see shared content in Canvas?
Recipients can click Account > Shared Content in the Canvas Global Navigation Menu to view, manage, and import course content that has been shared with them via this method. For full instructions, please reference this Canvas Instructor Guide on managing shared content.
What is a good role to use when adding a user to a course in order to give them access to?
A good role to use when adding a user to a course in order to give them access to course content is "Interpreter Pre-Semester. ". This role allows the user to access course materials and import them into other courses, but the role does not allow the user to create, edit, or delete content inside of the course.
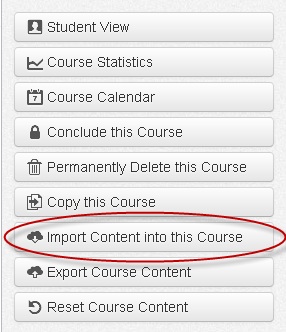
Can you import a course file into Canvas?
The recipient downloads the course export file to their computer and then imports it into their Canvas course. Course export files can be imported as a whole or specific content can be selected for import. Full instructions for this step of the process are documented in this Canvas Instructor Guide page on importing course export files.
Can you send a Canvas course file to another person?
Send the course export file to the desired recipient. This step is performed outside of Canvas. Course export files can often be too large to email. Uploading the file to OneDrive and then sharing the file on OneDrive is one recommended method for sharing a Canvas course export file.
Can instructors use roles in Canvas?
Course instructors have a large list of user roles to choose from when adding a user to their Canvas course. UW System has provided descriptions for all of the course-level roles in Canvas on the DLE KnowlegeBase. To protect student information and safeguard against the accidental deletion or modification of course content, it is best to use roles that have limited privileges when full (teacher-level) access to the course is not necessary.
Popular Posts:
- 1. which institute is best for medical transcription course in bangalore
- 2. what is financial management course
- 3. what is the best lsat prep course to take
- 4. how to write a college course curriculum
- 5. how long is billing and coding course
- 6. how long is medical assistant course
- 7. what is pmp training course
- 8. what is a course management system
- 9. what is business management course
- 10. how long is hvac course