Creating a Grade Column
- Access the Full Grade Center. Click on Grade Center in the Control Panel to reveal the drop-down menu. ...
- Create Column. Click on the Create Column located in the gray row of buttons near the top of the page--you should now see the Create Grade Column ...
- Fill in the Create Grade Column Options. Fill in the following information in section 1. Enter a descriptive name for the Column. ...
Manually add grade items
- Select the plus sign wherever you want to add an item and select Add Item.
- In the panel, type a title. ...
- Optionally, make the item visible to students.
- Provide the details, such as a description and a grade unit. ...
- Optionally, add the new item to a category to use when you create calculations.
How do I set up grading schemas in Blackboard?
Set up your schemas BEFORE the start of the semester. The best way to record grades using letter grades is ALWAYS input a numeric score or percentage and let Blackboard generate the letter grade—that way all students have the exact grade value they earned. From your course Control Panel select Grade Center, then Full Grade Center.
How do you grade grades on blackboard with letters?
The best way to record grades using letter grades is ALWAYS input a numeric score or percentage and let Blackboard generate the letter grade—that way all students have the exact grade value they earned. From your course Control Panel select Grade Center, then Full Grade Center. Choose Manage, then Grading Schema.
How do I set the external grade for a course?
To set the external grade, open a column's menu and select Set as External Grade. The External Grade icon appears in the column header you chose and no icon appears in the default total column header. If you copy or restore a course, the external grade column you chose remains as the external grade column.
How do I set the Grade Center for my course?
Instructions. 1 Step 1. From your course Control Panel select Grade Center, then Full Grade Center. 2 Step 2. 3 Step 3. 4 Step 4. 5 Step 6. More items
How do I create a grade column in Blackboard?
Under the control panel click the Grade Center bar on the menu and then select Full Grade Center. Once inside the Grade Center, click Create Column on the Action Bar. On the Create Grade Column page, enter the Column Name and optional Description. [Enter a brief, descriptive name.
How do you set a column as an external grade in Blackboard?
To set the external grade, open a column's menu and select Set as External Grade. The External Grade icon appears in the column header you chose and no icon appears in the default total column header. If you copy or restore a course, the external grade column you chose remains as the external grade column.
How do I organize grades in Blackboard?
Go to Ultra Course View page. In the Grade Center, the columns for students' first and last names appear first by default....Organize columns in the Grade CenterReorder columns quickly with the drag-and-drop function.Freeze or unfreeze columns in the first table. ... Hide or show multiple columns.More items...
How do I add a grade tab in Blackboard?
The My Grades link will then appear at the bottom of the course menu....Adding the My Grades Tool, Part 2Name: Enter a name for the tool link here.Type: Select My Grades from the dropdown menu.Available to Users: Check the box to make the link available to students.When you are finished, click the Submit button.
How do I make grades visible to students in Blackboard?
0:451:47Guide Blackboard Grade Center Making grades visible and invisible ...YouTubeStart of suggested clipEnd of suggested clipThe easiest way to do that is to click on the Chevron next to the title of that Grade Center column.MoreThe easiest way to do that is to click on the Chevron next to the title of that Grade Center column.
How do I use grade Center in Blackboard?
6:548:09Blackboard for Instructors - Full Grade Center - YouTubeYouTubeStart of suggested clipEnd of suggested clipYou can manually enter grades in the following areas directly in cells on the main grade center pageMoreYou can manually enter grades in the following areas directly in cells on the main grade center page by clicking view grade details from the contextual menu of a cell.
How do I move columns in grade Center Blackboard?
Reorder Blackboard Grade Center ColumnsIn your Blackboard course, navigate to the Control Panel.Click Grade Center.Click Full Grade Center.Click Manage.Select Column Organization.Locate the column you want to move.Click and drag the arrows to move the column within the Grade Center.Repeat this process as needed.More items...•
How do I move a graded column in Blackboard?
Position the mouse pointer on the cross icon to left of the column you wish to move. Press and hold the left mouse button, drag the column up or down to change the order of the columns. Release the left mouse button. Click Submit.
What is a frozen column in Blackboard?
Freezing columns allows you to scroll through the Grade Center keeping certain columns frozen as you scroll through content.
How do I create a weighted column in Blackboard?
In Control Panel, click Grade Center, and select Full Grade Center. In “Full Grade Center” page, click Create Calculated Column and select Weighted Column. Name the column and determine the Primary Display. In the Select Column section, click specific categories or columns you want to weight.
Where is the grade Centre on Blackboard?
Accessing the Grade Center The Grade Center is accessed from the Control Panel in any Blackboard course. Click the arrow to the right of the Grade Center menu link to access the full Grade Center.
Why did my grade disappear on Blackboard?
The Answer If you have submitted an assignment and you don't see a grade, that means the instructor has probably not graded the assignment yet. The yellow exclamation point icon means that the assignment still needs grading.
How to make a column name in grade center?
On the Create Grade Column page, type a brief name and an optional description. The name becomes the column name in the Grade Center and on students' My Grades pages. If the name is too long to display clearly in the Grade Center, add a shorter name in the Grade Center Name box.
How many default user columns are there in the Grade Center grid?
In a new course, six default user columns appear in the Grade Center grid:
What are the three types of columns in the Grade Center?
Three types of columns. In the Grade Center, three types of columns appear: user, calculated, and grade . Each column has a menu with options. The options that appear vary based on the type of column. When you create or edit columns, you can select settings to display the data you want in the Grade Center.
What happens if you delete a content folder in a content area that contains graded items with no attempts?
If you delete a content folder in a content area that contains graded items with no attempts, the corresponding columns are also deleted from the Grade Center.
What is the default setting for grades?
Score: A numeric grade is the default setting. If you don't make a selection, the score appears in the grid.
Where is the column not visible to users in Grade Center?
In the Grade Center grid, the column appears with the Column Not Visible to Users icon next to the column title.
Can you change the name of a column in the grade center?
Each column's menu displays options that are specific for that column. In the Grade Center, you can't change the Item Name of columns created automatically for gradable items, such as tests and assignments. You can edit the name of a gradable item in your course and the name will change in the Grade Center.
What is an associated rubric?
Associated Rubrics allows you to create or select a grading Rubric that is associated with this Grade Column.
Can you include a column in grade center?
Select Yes to include the column in any future Grade Center calculations. For example, the default Total column, will automatically (unless otherwise specified) include the scores from all columns for which this option has been set to Yes.
What is the default setting for grades?
Score: A numeric grade is the default setting. If you don't make a selection, the score appears in the grid.
When to include calculated column?
You can include a calculated column when you create another calculated column. For example, if you created a calculated column that weighs quiz grades, you can include the column when you create a final grade column.
What is a weighted column?
The weighted column generates a grade based on the result of selected columns and categories, and their respective percentages. When you create a weighted column, you can include other calculated columns and other weighted columns.
How to find the average of all columns?
To find the average of all selected columns, the percentage is calculated to four decimal places. The percentage values for all selected columns are added together. The result is divided by the number of columns included in the calculation. The result displays according to the Primary and Secondary Display options.
How to calculate weighted column percentage?
When not calculated as a running total, the weighted column's total percentage is calculated by summing the weighted values for categories A, B, and C and multiplying by 100/100. The denominator of 100 is the summed weights of all categories—which is always 100.
What happens when you combine extra credit with weighted total?
When extra credit is combined with a weighted total column, points are added to the achieved weighted score. The achieved weighted score is then divided by weighted points possible to produce a percentage. Read more about extra credit with weighted total columns.
What is total column?
The total column generates a grade based on the cumulative points earned, related to the points allowed. You can select which columns and categories are included in a total column's calculation. When you create a total column, you can include other calculated columns.
What is a group grade?
Groups: Grade all students who are members of the selected course groups.
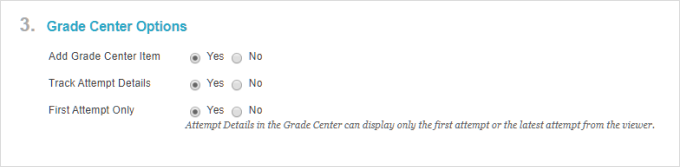
How many attempts can you make in a grade center?
Number of Attempts: Allow single, multiple, or unlimited attempts. If you select more than one attempt, you can also decide which attempt to use in the Grade Center.
Why do you have to allow anonymous grading?
You can enable anonymous grading to eliminate grading bias for high-stake assignments. You can hide student names during grading, making them anonymous. You aren't unduly influenced by a student's previous performance, class participation, conflicts, race, gender, or perceived student aptitude. This practice can also contribute to the student-instructor relationship because students are assured that grading was unbiased.
Why do you need to grade more than one grader?
Grading and feedback from more than one grader promote reliability, improve consistency, and remove bias. You can assign specific users in your course to grade particular sets of student assignment submissions. For large classes, you can divide up the grading tasks among teaching assistants and other graders.
Who can reconcile grades?
In the Reconcile Grades column, choose who can determine the final grade and feedback for each student. All instructors can reconcile grades. Instructors can allow teaching assistants and graders to reconcile grades. Users who reconcile grades are also called final graders.
Can you include assignment score in grading calculations?
You can also choose to include the assignment score in grading calculations.
How to create a new gradebook category?
To create a new gradebook category, select the Settings icon in the gradebook. In the Gradebook Settings panel, select Add New Category and type a name. Each time you create a graded item in your course, you have the option to change the grade category so the item is grouped into one of the custom gradebook categories.
What is a grade category?
Grade categories. When you create a gradable item, it automatically appears in the gradebook and is associated with the appropriate category. You can use categories when you create calculated items, such as an assignments average. You can create new categories to customize how coursework is grouped in your course.
What is the function of grade center?
One of the most useful functions of the Grade Center is the Column Organization function , since it not only organizes columns, but does much more. Let's run through what can be done there.
Can you hide columns in Grade Center?
If there are columns that you do not need to see in the Grade Center, you can hide them. This does not delete them, but they are removed from view. Note that this is not the same as the Show this Column to Students option; the option to hide columns affects only what you see in the Grade Center.
What are the rows in a grader's grade?
The rows consist of letter grade constraints and their default percentages.
What percentage is a letter grade?
A letter grade can also be associated with an exact percentage, for instance, if it is defined that an A is equivalent to 95% , then if an A is entered the student will automatically receive a 95% (shown as letter B in the image below).
When to set up schemas?
Set up your schemas BEFORE the start of the semester.
Can you enter grades in Blackboard?
All grades in Blackboard must have a numeric point value associated with the item, but the instructor can enter grades as letters and/or students can view their grades as letters. To accomplish this, the instructor must 1) first decide what point value a letter will represent (a grading schema) and 2) then change the graded item view from number score to letter.
Three Types of Columns
About User Columns
- In a new course, six default user columns appear in the Grade Center grid: 1. Last Name 2. First Name 3. Username 4. Student ID 5. Last Access 6. Availability You can't delete or edit default user columns. You can hide all but the first user column in the grid. If you need to hide the first column, you can rearrange the user columns on the Column O...
External Grade Column
- The results in the external grade column are shared with your institution as your students' grades for your course. You decide which column is set as the external grade. In new courses, the default total column is the default external grade column, and the External Gradeicon appears in the column header. You can't delete the default total column until you set another column as the ext…
Menu Options
- Each column's menu displays options that are specific for that column. Example: Edit column names In the Grade Center, you can't change the Item Nameof columns created automatically for gradable items, such as tests and assignments. You can edit the name of a gradable item in your course and the name will change in the Grade Center. On the Edit Column page for auto-created …
Automatic Deletion of Grade Columns
- If you delete a content folder in a content area that contains graded items with no attempts, the corresponding columns are also deleted from the Grade Center. More on deleting containers and content
Popular Posts:
- 1. which institute is best for medical transcription course in bangalore
- 2. what is financial management course
- 3. what is the best lsat prep course to take
- 4. how to write a college course curriculum
- 5. how long is billing and coding course
- 6. how long is medical assistant course
- 7. what is pmp training course
- 8. what is a course management system
- 9. what is business management course
- 10. how long is hvac course