How To Create A Week By Week Course In Blackboard
- Course Structure: Weekly – Blackboard Help. Organizing content by time can help students stay on track. ...
- Create Content | Blackboard Help. Your course creation starts on the Course Content page. ...
- Building Out in Blackboard – Course Design & Development …. ...
- Organization and Adding Content | Blackboard at KU. ...
Full Answer
How do I create a course in Blackboard Learn?
Blackboard Learn provides several methods for creating courses. The privileges assigned to your user account determine which methods are available to you. Users with privileges to create courses can do so in the Courses section on the Administrator Panel. You can also copy existing courses or create multiple courses at once by using a batch file.
How do I use the calendar on Blackboard?
You can access the calendar from your course, from the Tools panel on the My Institution tab, or from the My Blackboard menu. View events by day, week, or month. Use the arrows to navigate to another month.
How do students join a session in Blackboard Collaborate Ultra?
By default the link name is Blackboard Collaborate Ultra. When you add Blackboard Collaborate to your course content, it links to the tool, not a specific session. Help your students find the session you want them to join. Tell them the session name in the link name or content editor.
Where do I find Blackboard Collaborate?
You can find Blackboard Collaborate in your Course Tools. Your administrator decides the Blackboard Collaborate with the Ultra experience you use in your course. Blackboard Collaborate Ultra: You have both a dedicated course room and the ability to schedule as many new sessions as you want.
How do I create a weekly module in Blackboard?
Select the plus sign wherever you want to add a learning module. In the menu, select Create to open the Create Item panel. Select Learning module....Create a learning module and add contentDocuments.Files.Tests and assignments.Folders.Multimedia.Links to websites, discussions, and journals.
How do I create a course template in Blackboard?
Create a course templateOn the Administrator Panel in the Courses section, select Courses.Search for a course.Open the course's menu and select Template Options.Select Use this course as a course template.Select Submit.
How do I create a course shell in Blackboard?
Create a courseOn the Administrator Panel, in the Courses section, select Courses.Point to Create Course and select New. You can merge existing sections, allowing instructors to manage multiple sections of the same course through a single master course. ... Provide the course information. ... Select Submit.
How do I create a calendar in Blackboard?
Step 1: In the Control Panel, select Course Tools, then select Course Calendar.Step 2: Click on the “+” button to create an event.Step 3: On the Create Event page, enter the Event Name.Step 4: Enter an Event Description.Step 5: Enter the Date and Time the Event starts, as well as the Date and Time it Ends.More items...
How do I import a course template into Blackboard?
On the Home tab, under My Courses, click on the new course—the course where you want to import the course template. On the left side course menu under Course Management, click Packages and Utilities and then click Import Package/View Logs. On the new screen, click on Import Package.
How do I import a template into Blackboard?
Import templates Select Import Template. Find and select your import file. Select Open.
What is a shell course?
The course shell is a starter structure for your course. This shell is based on a set of online course design guidelines from UVM's Continuing and Distance Education and the Center For Teaching and Learning. Students have reported that they find it easier to have a familiar structure from week to week.
How do I create a master course in Blackboard?
0:291:50Creating a Master Course - Blackboard Learn - YouTubeYouTubeStart of suggested clipEnd of suggested clipAnd you will see a link for the master course creator. Click on create a master course in order toMoreAnd you will see a link for the master course creator. Click on create a master course in order to begin the process to create your master course you will need to select a series of options.
How do I create a new course?
To create a new course:Click on the Settings tab.Under Course Management, click on Create a new course.Click on New course and then click on Next. ... Enter the Course name and Course end date, then select the Product from the drop-down list.Click on Submit.More items...
How do I use Calendar in Blackboard?
To share your Blackboard Learn calendar with iCal, you'll add it as a calendar subscription....Add calendar to iCalOpen iCal on your Mac.Go to File > New Calendar Subscription.Paste the Blackboard Learn calendar link and select Subscribe.Enter the calendar's name and adjust other settings. ... Select OK to finish set up.
How do I access a timetable on Blackboard?
Currently students can view their personal timetable via SITS (https://my.tcd.ie). With this new Blackboard integration, students will now be able to view their timetable directly on their Blackboard calendar.
Can students see calendar in Blackboard?
The calendar tool allows users to view events by day, week, month, or year. You can view and organize upcoming and past events into categories. You can access the calendar from the Tools panel on the My Institution tab, My Blackboard, within a course, and on the Administrator Panel.
What is a folder in Blackboard?
Instructors can create a series of folders for each unit, chapter, week, or by topic. Once a folder is created, course materials and additional sub-folders may be added to it. Any of the Content types available in Blackboard's content area may be added to a folder.
What is a learning module?
A Learning Module is a Blackboard tool that helps organize course content into discrete units. Any Blackboard tool, item, file, assignment, test, or discussion board can be added to a Learning Module. Tip: A Learning Module automatically creates a Table of Contents for all items added to the module. The viewing of content can be set so students ...
How to organize assignments in a course?
There are two main ways to organize assignments in your course: By creating an Assignments link in the left Course menu. The left course menu with an Assignments link. By creating the assignments within each module/week/ topic folder . As mentioned earlier in this document, the course shell creates an Assignment link in the left Course menu.
Can you add a course shell to an existing course?
Adding the course shell to an existing course will not overwrite existing content in the course. You can move existing materials into the new areas created when you imported the shell. The tutorials below demonstrate several different methods:
How many levels of folders can you create?
You can create two levels of folders to organize your content. Students can navigate easier when they don't have to search for materials. Optionally, add folder descriptions to help students understand what content you've included in them.
Can you use goals to measure student achievement?
You and your institution can use goals to measure student achievement across programs and curriculums. After you successfully upload a file to your course, you can align one or multiple goals. Students won't be able to see the goals you align with a file. More on how to align goals with course content.
Can you create a third level folder?
After you already have two levels of folders, you can't create a third level or upload a folder into the second-level folder. Organize with learning modules. You can use learning modules in your course as containers for organized collections of content.
Can you add multiple files to a course?
You may choose multiple files from cloud storage to add to your Course Content page in one action. The files you add are copies. If you make a change to a file in cloud storage, you need to upload a new copy in your course. Content Collection: Add files from your institution's shared repository.
Watch a video about the calendar
The following narrated video provides a visual and auditory representation of some of the information included on this page. For a detailed description of what is portrayed in the video,
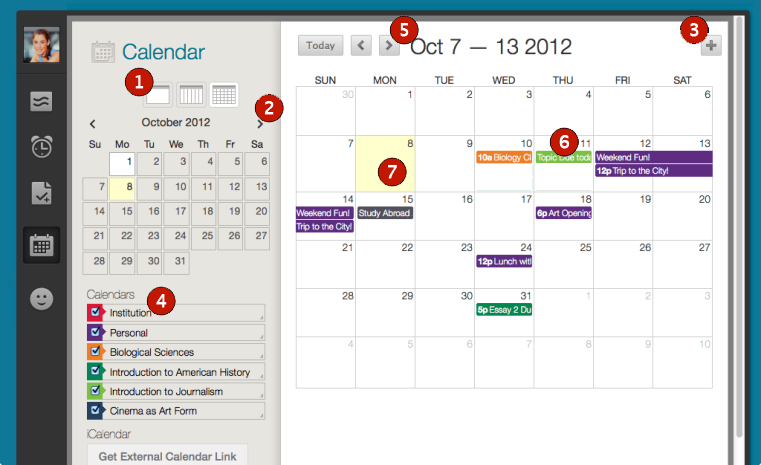
Find and navigate the calendar
You can access the calendar from your course, from the Tools panel on the My Institution tab, or from the My Blackboard menu.
Choose your view
The calendar displays a consolidated view of all your institution, course, organization, and personal calendar events. You can view events by day, week, or month. You can view and organize upcoming and past events into categories.
Create an event
Select the plus (+) button or select a specific date to create an event.
How to view a course in a session?
View your course while in a session. Collaborate sessions open in a new window or tab depending on your browser settings. Go to the course tab or window, if you want to view the course content during a session.
How long does a link last in a session?
You are not able to use the link to join session again or share your link with another user. Session links expire after 5 minutes.
What are the details of an event?
Event details include the name, date, and time of a session. Decide if the session is open ended or recurring. Make the name something meaningful for your attendees so they know what the session is for.
Can you track attendance in a course room?
Attendance reporting is only available in sessions with an end date and time. You can't track attendance in your course room. Create or edit a session and select the Share attendance information with LMS check box to turn attendance reporting on. Optionally, change the late, absent, and time is session thresholds.
What is a course calendar?
The course calendar displays due dates, the course schedule, office hours, and course-specific meetings and events. When instructors create content with a due date, it automatically shows in the calendar. All events instructors create within a specific course roll up into the global calendar.
How to add an institution event to a calendar?
Institution events appear on all users' global calendars and in their activity streams. Select the plus sign on the global calendar and select Add Event. In the panel, expand the Add to Calendar menu and select Institution. Or, you can add an institution event from the Admin Panel > Tools and Utilities > Calendar.
Can you access course calendars?
Users can access all their course calendars from the base navigation . For your users, the global calendar displays events and dates from multiple courses in one location. All due dates and meetings instructors create in their courses appear automatically on the calendar.
Can you turn off Ultra Course View?
You don't need to maintain the Ultra Course View calendar or manage settings. The tool is always on in the base navigation in the Ultra experience. You can't turn it off. Users can select the Calendar Settings icon in the upper-right corner to select the calendars they want to see.
Can you add events to your personal calendar?
Events students add appear on their personal calendars only. Instructors can also choose to add events to their personal calendars. The user is the only one who can view personal events. Users can add external calendar files to import multiple events at once.
Popular Posts:
- 1. which institute is best for medical transcription course in bangalore
- 2. what is financial management course
- 3. what is the best lsat prep course to take
- 4. how to write a college course curriculum
- 5. how long is billing and coding course
- 6. how long is medical assistant course
- 7. what is pmp training course
- 8. what is a course management system
- 9. what is business management course
- 10. how long is hvac course