Bb 9.1 Course Copy Copying areas from a Bb course to a different Bb course In the Control Panel
Control Panel
The Control Panel is a component of Microsoft Windows that provides the ability to view and change system settings. It consists of a set of applets that include adding or removing hardware and software, controlling user accounts, changing accessibility options, and accessing networking …

0:26
3:39
You will find instructions for copying the course on the lower right hand side of the page. At theMoreYou will find instructions for copying the course on the lower right hand side of the page. At the top of the page under select copy type use the drop down menu to choose the option copy.
How to create and add a course on Blackboard?
Create a course. On the Administrator Panel, in the Courses section, select Courses. Point to Create Course and select New. You can merge existing sections, allowing instructors to manage multiple sections of the same course through a single master course. To learn more, see How to Merge and Separate Child Courses.
What are the copy options for Blackboard courses?
- Go to the course whose content you would like to copy (the ‘source’ course)
- In the course’s Course Management area, under Packages and Utilities, click Course Copy.
- Under Select Copy Type, choose Copy Course Materials into an Existing Course.
- Under Select Copy Options, click Browse.
How to back up your blackboard course?
To save the spreadsheet for a course:
- Open the course and go to Control Panel > Grade Center > Full Grade Center.
- Open the Work Offline menu on the upper right, above the grade table.
- Choose Download.
- On the next screen, you can accept the default settings and simply click Submit at the bottom of the page. ...
- Click the Download button to retrieve the file. ...
How to put your course on Blackboard?
What you'll learn
- Create a course on the Blackboard platform
- Customizie your Blackboard page
- Upload documents to your Blackboard page
- Put your assignments on the Discussion Board
- Create tests in Blackboard
How do I copy an entire course in Blackboard?
Use the copy course buttonOn the Administrator Panel in the Courses section, select Courses.On the Courses page, select Copy Course.Select the type of copy to perform. ... Type the course ID in Source Course ID box. ... Type the course ID in the Destination Course ID box. ... Select Submit.
Where is the copy course button in Blackboard?
On the Control Panel, open Packages and Utilities. Click Course Copy. There are four sections on the Copy Course page. Select Copy Type: The option Copy Course Materials into an Existing Course should be selected.
How do I copy a content area to another course in Blackboard?
You can copy all the content or select individual items from the other courses you teach. On the Course Content page, select the plus sign to open the menu and select Copy Content. Or, open the menu on the right side above the content list. Select Copy Content.
Can I copy an assignment from one course to another in Blackboard?
Open the Blackboard course that has the course materials you would like to copy. 2. On the Control Panel, click on Packages and Utilities and then select Course Copy.
How do I import a course into Blackboard?
2:103:28How-to Import and Export a Course in Blackboard - YouTubeYouTubeStart of suggested clipEnd of suggested clipOnce you are in your blank blackboard class locate the control panel on the bottom left hand side ofMoreOnce you are in your blank blackboard class locate the control panel on the bottom left hand side of the page. Then select packages and utilities.
How do I import a test from one course to another in Blackboard?
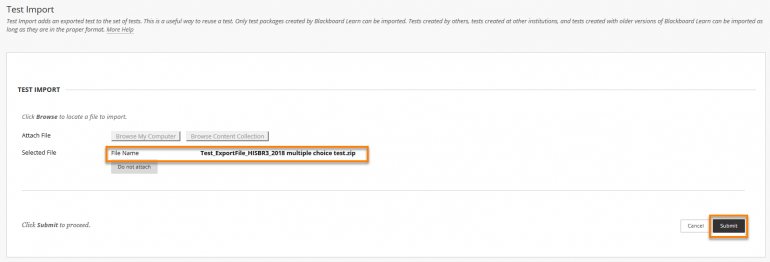
Next, import the test into the course of your choice:Navigate to the Blackboard course you will add the test to.Click Course Tools from the Control Panel. ... Ensure the Edit Mode is ON, found at the top-right of your course window.Click Tests, Surveys, and Pools. ... Click Tests. ... Click Import Test. ... Click Browse My Computer.More items...
How do you copy files in Blackboard?
In the Content Collection, go to the folder that contains the file or folder you want to copy. Select the check box next to the item and select Copy. You can also access the Copy option in the item's menu. Enter the path to the destination folder or select Browse to locate and select the destination folder.
How do I copy a test in Blackboard?
0:002:32Copy a Blackboard Test from One Course to Another - YouTubeYouTubeStart of suggested clipEnd of suggested clipClick on tests. We click on the little arrow next to the tests we want to copy into the otherMoreClick on tests. We click on the little arrow next to the tests we want to copy into the other section. And we click export to local computer. This may take a moment or two.
How do I recover a course on Blackboard?
Blackboard Learn creates a course with the data and settings from the archive package....Restore a courseOn the Administrator Panel in the Courses section, select Courses.Search for a course.Point to Create Course and select Restore. ... Select Submit.
How do you copy an assignment?
How to copy an assignmentNavigate to the course where you want to create the new copy of the assignment.Click "Create assignment"Choose "Copy existing assignment" at the top of the page. ... Select which assignment to duplicate / copy from the drop down menu.Give the copy a new name.More items...
How do I export assignments in Blackboard?
Export the Entire Package (course)Login to Blackboard.In Blackboard, access the course you want to transfer.Go to Control Panel > Packages & Utilities > Export/Archive Course.Click Export Package.Leave the default selections under File Attachments.Click Select All under Select Course Materials. ... Click Submit.More items...
How do I copy a course from Blackboard to youtube?
0:463:39Copy Course Content in Blackboard - YouTubeYouTubeStart of suggested clipEnd of suggested clipYou will find instructions for copying the course on the lower right hand side of the page. At theMoreYou will find instructions for copying the course on the lower right hand side of the page. At the top of the page under select copy type use the drop down menu to choose the option copy.
What happens when you copy a course?
The copied content is added to the end of the content list. When you copy an entire course's content, the visibility settings are preserved when the content is added to the new course. For example, hidden content in the copied course is hidden in the course you copied it to.
How to copy content from Ultra?
You can copy all the content or select individual items from the other Ultra courses you teach. On the Course Content page, select the plus sign to open the menu. Select Copy Content. Or, open the menu on the right side above the content list. Select Copy Content.
Is attendance included in a copy of a course?
Attendance data isn't included when you copy a course into a new or existing course. The attendance option is removed from the copy options. Attendance data is included in an exact course copy. More on attendance and course copying. Review all copied items to be sure you're showing the content you want to show.
How to add course materials to existing course?
You can add course materials to an existing course by copying them from another course. This maintains the course materials, user enrollments, and records of the existing course while adding the new course materials.
What is the value highlighted in a course file?
Although, the value highlighted corresponds to the size of the Course Files from the origin course, the system in this case is actually comparing the Course Size Disk Quota to the Maximum Package Size.
What does x mean in a course?
Allowed package size: x" appears. The x represents the custom value set as the maximum package capacity.
What is an exact copy?
An exact copy creates a new course and includes course materials, user enrollments, and staff assignments. For example, if a course is split into multiple sections to accommodate a large number of students, you can make an exact copy and then adjust the enrollment to create two sections of the same course.
Can you copy a link to a course?
Copy links and copies of the content: This will make copies of linked files, but ONLY those files that are linked. Files within the course's home folder that are not linked to any content within the course are not included in the copy.
Can you copy enrollments from one course to another?
You can copy enrollments from one course to another even if you do not copy any course materials.
How to include content collection in Blackboard?
To include Content Collection files in the copy, select Select Folder and browse to a folder. Blackboard Learn places the files in a sub-folder of the folder you select here. To ignore Content Collection files, select Course Files Default Directory.
What is the name of the course you copy?
The course you copy is called the "source course." The course you create or add materials to is called the "destination course."
How to add a course to a destination course?
In the Destination Course ID box, provide the course ID of the course you're adding the materials to. If you don't know the course ID, select Browse to launch the search dialog. Select the course and select Submit to use it as the destination course.
What can you include in a copy of a course?
About course materials. When you copy a course, you choose which course materials to include. For example, you can include content areas, collaboration sessions, and contacts, but exclude journal entries. If you create a new course, you must select at least one of these areas: Content, Contacts, or Settings.
What happens if you copy a course section?
If the copied sections of a course include links to materials that you don't copy into the destination course, the links will break in the destination course. For example, if a course area links to a test but you don't copy the tests, the link to the test will break. After copying, edit the destination course to update or remove any broken links.
What is the content area of a destination course?
For example, the destination course has a content area called "Tools" that contains blogs and journals. The source course has a content area called "Tools" that contains course files. After the copy, the destination course has two content areas: the original "Tools" and the new "Tools1.".
How to add course materials to existing course?
You can add course materials to an existing course by copying them from another course. You can maintain the course materials, user enrollments, and records of the existing course while adding the new course materials.
How to export a Blackboard course?
Open the course's menu and select Export/Archive. The Export/Archive Course page lists all export or archive packages for this course that have not been deleted from Blackboard Learn, even if you have already downloaded the package. The file names include the date and time the package was created.
What is the Blackboard Learn format?
The Blackboard Learn packaging format follows the IMS Content Packaging Specification, with extensions to support content types that are specific to Blackboard Learn.
What happens if a user importing or restoring a course does not have manage permission?
If a user importing or restoring a course does not have manage permission, some of the package contents might not upload successfully.
What happens if you have a different email address in Blackboard?
If a username exists with a different email address than the one included in the archive package, Blackboard Learn creates a new user account. The new account has the same username with a sequence number appended.
How to include content collection in Blackboard?
To include Content Collection files in the restore, select Select Folder. Select Browse to navigate to the folder. Blackboard Learn creates a sub-folder and copies the Content Collection files into it.
What is a course export?
Exporting a course creates a ZIP file of the course content called a course package. You can import course packages back into Blackboard Learn to create a new course with the same content. Exporting a course includes only the course content. The export does not include any user interactions such as blog posts or grades.
What is a certified path in Blackboard?
The following table identifies the supported paths for importing or restoring a course that was exported or archived from older learning management systems. Certified paths are fully tested and supported by Blackboard. Compatible paths are not fully tested but should function correctly based on past performance.
Copy Course Function
- Access the course you want to copy.
- On the Control Panel, expand the Packages and Utilities section and select Course Copy.
- Select the appropriate option:
- In the Destination Course IDbox, type a course ID for the new course that will be created and …
- Access the course you want to copy.
- On the Control Panel, expand the Packages and Utilities section and select Course Copy.
- Select the appropriate option:
- In the Destination Course IDbox, type a course ID for the new course that will be created and populated with content from the current course. Make sure that the new course ID matches the naming con...
Add Course Materials to An Existing Course
Move Users to Another Course
Create A New Course
- The other procedures in this topic instruct you to search for the course you want to copy and then open the course's menu to begin. If you know the exact course IDs of the source and destination courses, you might find it faster to use the copy course function. 1. On the Administrator Panel in the Courses section, select Courses. 2. On the Courses page, select Copy Course. 3. Select the t…
Copy A Complete Course, Including Users
- You can add course materials to an existing course by copying them from another course. This maintains the course materials, user enrollments, and records of the existing course while adding the new course materials. 1. On the Administrator Panel in the Courses section, select Courses. 2. Search for a course. 3. Open the course's menu and select Copy. 4. In the Select Copy Type dro…
Popular Posts:
- 1. which institute is best for medical transcription course in bangalore
- 2. what is financial management course
- 3. what is the best lsat prep course to take
- 4. how to write a college course curriculum
- 5. how long is billing and coding course
- 6. how long is medical assistant course
- 7. what is pmp training course
- 8. what is a course management system
- 9. what is business management course
- 10. how long is hvac course