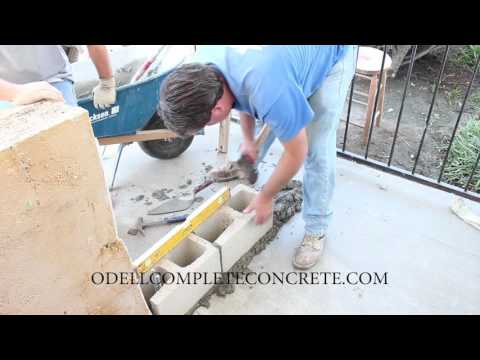
Install the second course in the same fashion as the first—applying a bed of mortar along the top of the previous course, and buttering the ends of each block as you lay it into the mortar. Use the mason's string and level to frequently check each course of blocks for level and straight.

1:32
3:10
One end of the block. And set it next to the corner block. Then press the block down into the mortarMoreOne end of the block. And set it next to the corner block. Then press the block down into the mortar bed. And against the previously laid block. So that the mortar joined is 3/8 inch wide adjust.
What is a split faced block?
Apr 20, 2019 · https://www.westcoastcustomconcrete.net/Instagram https://www.instagram.com/westcoastcustomconcrete/?hl=enFacebook https://www.facebook.com/westcoastcustomco...
Why do split-faced block houses have water problems?
In addition to color, split face concrete blocks come in a variety of shapes and sizes, so we are sure to have what you need. Typical standard finish dimensions are 7 5/8” x 15 5/8”, while nominal bed depth sizes include 4″, 6″, 8″, 10″ and 12″. These various split face CMU block sizes will allow you to customize the ideal ...
How do you join two blocks of brick together?
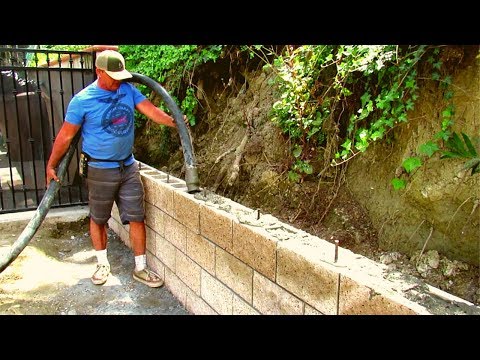
How to build a small double faced rock wall at a nice height to sit on.
How many gallons of water are in a split faced block?
Aug 10, 2021 · 1. Lay out the first layer of cinder blocks. Starting at one end of the wall, lay out the cinder blocks, end to end, until you reach the first turn in the wall. If your wall is straight, line up the first layer of cinder blocks from one end to the other end. Put 3⁄8 inch (0.95 cm) plywood spacers in between the blocks.
How do you split retaining wall blocks?
0:04
1:06
Use a hammer and chisel to score the block on all sides pound the chisel on the score line until theMoreUse a hammer and chisel to score the block on all sides pound the chisel on the score line until the block splits. To build a 90-degree corner. You will need a circular saw with a masonry blade.
Can you use split face block for retaining wall?
1:40
5:36
3 feet or 4 block whatever we're doing it's a split phase 8x8 I say teen. Makes a sturdy block wallMore3 feet or 4 block whatever we're doing it's a split phase 8x8 I say teen. Makes a sturdy block wall I'm not a block wall guy I've only done a couple of them.
How do I add a course to a block wall?
1:09
3:38
The first course on top of the existing slab that the other portion of the block wall is sitting onMoreThe first course on top of the existing slab that the other portion of the block wall is sitting on as.
How do you put two concrete blocks together?
Mounting putty is a sticky, clay-like material that comes in sticks or cubes. It's rolled into balls by hand and used as a substitute for pushpins or tacks. Mounting putty is especially good for cinder block walls because it is thick enough to fill in cinder block's bumpy surface.Jun 8, 2021
Can you build a retaining wall with cinder blocks?

A cinder block retaining wall is only as straight and solid as the base it's built on. For a 4-ft. tall wall, excavate a trench deep enough to accommodate 4 to 6 in.Mar 2, 2021
How much are split-face blocks?
Expect to pay about $3 per square foot for split-face concrete or cinder units and add $9 to $12 per square foot for installation labor, supplies, and equipment. A completed, 100-square-foot project will cost between $1,200 and $1,500, depending on the difficulty of the installation.Jul 15, 2020
Do Besser blocks need to be filled?
Do Besser blocks need to be filled? Unfilled Besser blocks do not have much strength and so yes, Besser blocks need to be filled with steel reinforcement and concrete to make them strong enough to sideways loads like wind loads.
Can you build a cinder block wall without mortar?
QUIKWALL® Surface Bonding Cement (SBC) now makes most block construction possible without using mortar; it's literally a "stack and stucco" project. A single coat on dry-stacked block gives a handsome stucco finish and provides greater flexural and impact strength than mortar with less expense.
Should I fill hollow concrete blocks?
Considering everything, filling your cinder blocks isn't exactly necessary, but it is completely safe, assuming you don't add dirt in it. Filling cinder blocks can help you make the structure sturdier or improve insulation, while a mix of gravel and sand can actually help you achieve both.Feb 1, 2021
How do you bond cement blocks?
1:57
3:08
The overall strength of the wall depends upon the thickness of the cement. And how uniformly it isMoreThe overall strength of the wall depends upon the thickness of the cement. And how uniformly it is applied. In general about 1/4 to 5/16 inch of cement is needed in most applications.
What do you use to bond concrete to concrete?
QUIKRETE® Concrete Bonding Adhesive (No. 9902) permanently bonds new concrete, plaster, and stucco to existing concrete, plaster, and stucco.
Can you use Gorilla Glue on concrete?
A moisture activated polyurethane adhesive, such as the original Gorilla Glue formula, glues concrete to both porous and nonporous materials. It adheres to concrete, metal, glass, wood, and stone, among other surfaces.
What type of block is used for a wall?
Concrete block. Block shapes and sizes are chosen to match the function of the wall and the configuration of the wall. Most cement block walls will use several different types of blocks, especially stretchers and corner units. Mortar joints.
Can you mix concrete for a foundation?
Concrete for the foundation can be mixed by hand in a power mixer or mortar box, or it can be ordered from ready-mix sources and delivered by truck.
Do you need to cut concrete blocks?
If you plan carefully, you may not need to cut concrete blocks, but if it is necessary, this best done with a power saw fitted with a masonry blade, along with a masonry chisel and hammer.
What is a CMU block?
Updated August 08, 2019. The residential and commercial construction industries make wide use of a form of concrete building material known officially as a concrete masonry unit (CMU). These hollow-core blocks can be made of standard concrete with traditional sand and gravel aggregate held together with Portland cement.
What is vertical reinforcement?
Vertical reinforcement is provided by lengths of steel rebar embedded in wet concrete that is poured into block cavities at prescribed intervals.
What is a stretcher unit?
The most common are: Stretcher unit —has flange extension on both ends. Used in the middle of walls where both ends are covered by adjoining blocks. Single corner unit —has one squared-off end. Used at the ends of walls where the end of the block is exposed. Double corner unit —has two squared-off ends.
What is split faced concrete block?
Many of these condominium buildings utilized a newer exterior masonry product that is commonly called split faced concrete block.
Does sealing a block help?
Exterior wall sealing – Contrary to common believe, sealing the block is NOT the final solution, but does help (BUT DOES NOT CURE) the problem. While it is better to have the block sealed, it is not necessary if the building was properly constructed. Sealing adds water impermeability to the block and acts to shed water off the surface. When the exterior wall of block is not sealed, and depending upon local weather conditions, rain water and humidity in the air is drawn into the block. This moisture travels through the masonry into the insulation and drywall. It should be stressed that the majority (70 – 80%) of the water intrusion DOES NOT come, from the sides, through the walls but flows downwards from the unflashed parapet wall coping stones and stone window sills. That being said, the moisture intrusion through the walls must not be ignored.
What happens when water comes through the ceiling?
When water is coming through your ceiling or walls near the ceiling, people logically thing that the roof is leaking. I have many clients who had their roofs completely replaced, but the water kept coming in.
Is a building waterproof?
The problem is that almost impossible because most building materials (wood, stone, masonry, siding) are porous. The exterior of a building is not “waterproof” but merely water resistant. It allows waster to “shed” off the exterior surface. These susceptible areas must be “flashed”.
What is flashing in a house?
Flashing involves installing a water impermeable barrier (vinyl, rubber or metal) between the outside and the inside of the house, and between building materials of different water absorptive levels (i.e., between wood and masonry).
What is the purpose of a building envelope?
A building envelope serves as a barrier to heat (thermal insulation), but also to air leakage (cold air infiltration, in the winter, and cold air loss, in the summer), water intrusion (liquid water) and vapor movement (humidity, which will condense into liquid water).
How thick should mortar be for a block?
Use a trowel to add mortar to the area between your traced lines. Spread the mortar to be about 1 inch (2.5 cm) thick. You can use premixed mortar or buy a bag of mortar mix and mix it yourself according to the package directions.
How to determine the width of a wall?
1. Determine the width of your wall. To determine the width of your future wall, decide how many cinder blocks you want to use for the wall width , then calculate the width using the block's measurements.
How wide should a footing be?
For example, if your wall will be 3 feet (0.91 m) wide, your footing area should be between 6 feet (1.8 m) and 9 feet (2.7 m) wide. Footing helps to spread the weight of a load-bearing wall across an area of soil.

Popular Posts:
- 1. which institute is best for medical transcription course in bangalore
- 2. what is financial management course
- 3. what is the best lsat prep course to take
- 4. how to write a college course curriculum
- 5. how long is billing and coding course
- 6. how long is medical assistant course
- 7. what is pmp training course
- 8. what is a course management system
- 9. what is business management course
- 10. how long is hvac course