Place a generous amount of silicone caulk in the cut line. Insert the flashing into the cut line and over the ledger board. Please see our ledger flashing section for a detailed photo of proper flashing placement (although brick flashing will be a bit different).
Full Answer
How do you run flashing on brick walls?
Run the L-shaped flashing up under the bottom row of siding so that it tucks under the final, bottom row, and on top of the wall and on top of the last row of bricks before you cap it with the cap stones/ledge pieces.
What is flashing between brick and siding?
Flashing between brick and siding is a relatively similar process on all types of brick to siding transitions, although there may be slight variations based on manufacturer recommendations.
Can I use Z track Flashing for brick work?
You may be able to purchase flashing meant for brick work or in some cases you can modify Z-track flashing to work. Install the ledger board according to local building codes.
Is it difficult to install brick flashing on a porch?
Like ledger flashing, installing brick flashing is not difficult to do and will extend the life of your front porch or deck. Water and ledgers don't mix and that is why most fail.
How do you attach flashing to brick?
3:134:36Chimney counter flashing inserted into the grout, Installing ... - YouTubeYouTubeStart of suggested clipEnd of suggested clipJust hold it up and by tomorrow. This will be set because this is an adhesive caulking. It's a greatMoreJust hold it up and by tomorrow. This will be set because this is an adhesive caulking. It's a great great coffee you put it on bricks and it just holds.
How do you attach flashing to masonry?
0:030:45Installing Flashing at Brick or Stone - YouTubeYouTubeStart of suggested clipEnd of suggested clipAt points where vinyl panels meet brick chimneys or stairs install. Step flashing start at theMoreAt points where vinyl panels meet brick chimneys or stairs install. Step flashing start at the lowest point and overlap as you work up flashing can be created using aluminum trim coil.
Does flashing go under brick?
2:436:27Flashing at the Base & Weep Holes - YouTubeYouTubeStart of suggested clipEnd of suggested clipAnother light bed of mortar on top and then lay the brick it'll settle into place just fine thatMoreAnother light bed of mortar on top and then lay the brick it'll settle into place just fine that piece of flashing will be sandwiched in that joint.
How do you secure metal flashing to brick?
Chalk a straight line about 2 inches above the back of the base flashing. Using the circular saw and masonry blade cut a slot about 1.5 inches into the brick so that the overlapping flashing or counter flashing will slide into the slot. Caulk the slot after the flashing has been installed.
How do you flash a window in a brick wall?
4:137:17Flashing the Window Head & Sill - YouTubeYouTubeStart of suggested clipEnd of suggested clipAcross his opening. And it should extend at least four inches past the window or rough opening onMoreAcross his opening. And it should extend at least four inches past the window or rough opening on each side to allow for support on the masonry on both sides of the window carry.
How do you seal flashing to concrete?
1:061:51Waterproofing - Flashing a Concrete Slab To Porch - YouTubeYouTubeStart of suggested clipEnd of suggested clipOur Illuma flash is wrapped over that or if you had a peel. And stick house trap you'd wrap overtopMoreOur Illuma flash is wrapped over that or if you had a peel. And stick house trap you'd wrap overtop of that now that water that comes up here is going to hit that stainless.
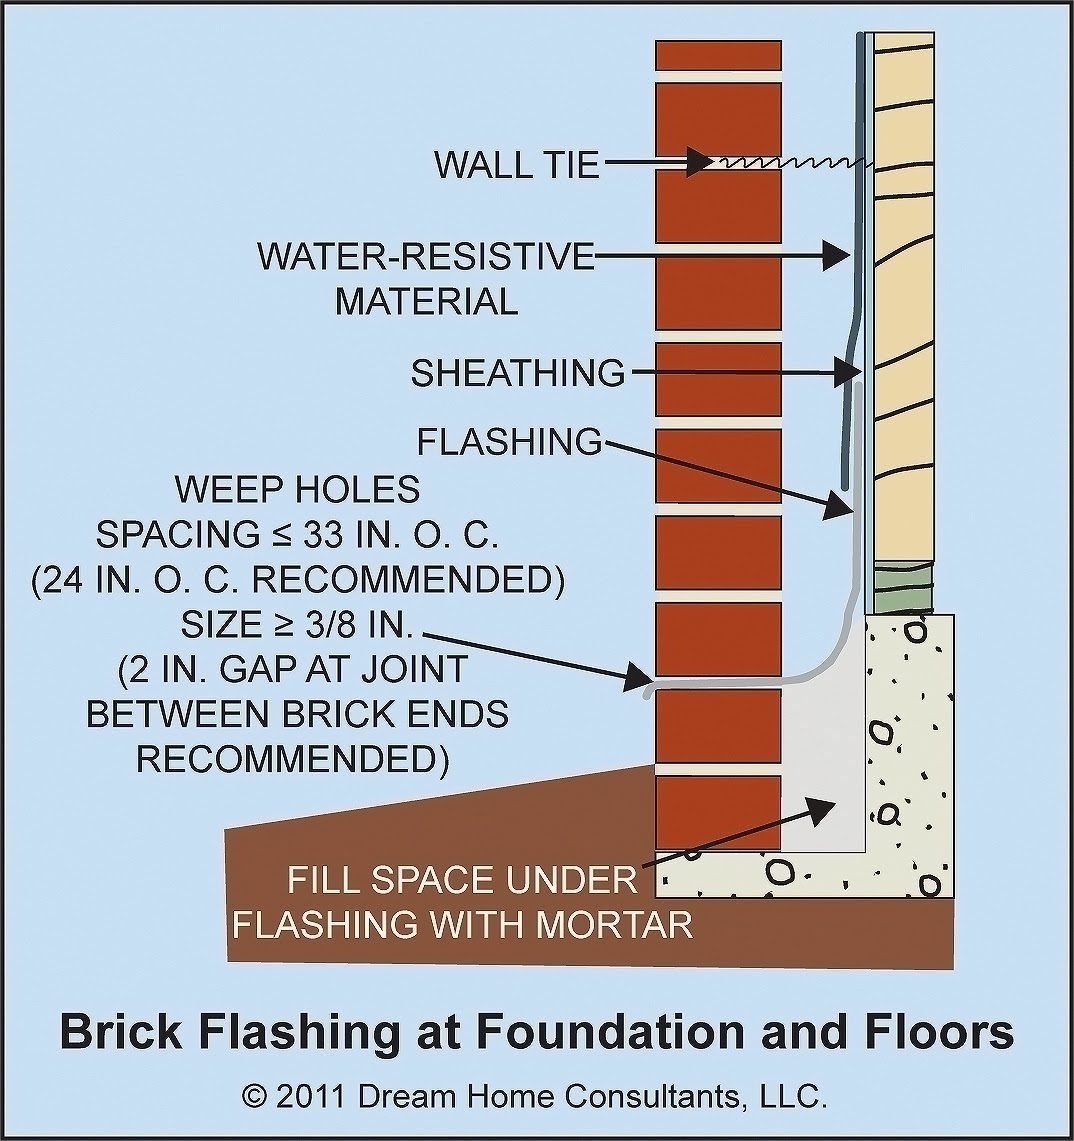
Where should flashing be installed in a masonry wall?
Flashing must be located beneath the first course of masonry above the finished ground level above the foundation wall or slab and at other points of support, including structural floors, shelf angles, and lintels when masonry veneers are designed per Section R703.
What is flashed brick?
In brick and tile: Natural colours. The process is known as flashing, and in general the change of colour of the bricks is only on the surface, the body of the unit retaining its natural colour. Some metals, such as manganese, are mixed with the clays to develop special colours.
Should flashing go under house wrap?
The house wrap has to be flashed properly to keep the water moving down and out, not down and in. That means you want the upper layers to come down over the top of the lower layers. Where builders often get this wrong is at the top of a window.
How do you attach metal flashing?
2:233:34How to Install Flashing on a Roof | Mastering the Roof by GAF - YouTubeYouTubeStart of suggested clipEnd of suggested clipPlace the first step flashing strip over the end of the starter course shingle and secure. The stepMorePlace the first step flashing strip over the end of the starter course shingle and secure. The step flashing to the roof with 2 nails.
How to flash a ledger board?
Place a generous amount of silicone caulk in the cut line. Insert the flashing into the cut line and over the ledger board. Please see our ledger flashing section for a detailed photo of proper flashing placement (although brick flashing will be a bit different).
Why do ledger boards fail?
Water and ledgers don't mix and that is why most fail. To prevent wood rot it is important to install flashing over your ledger board properly.
Can you purchase flashing?
Purchase or make the flashing. You may be able to purchase flashing meant for brick work or in some cases you can modify Z-track flashing to work.
Can you nail into flashing?
Do not nail into the flashing. If you must, seal any openings with silicone caulk.
Can you attach a ledger board to a brick wall?
CAUTION: You must never attach a ledger board to the brick veneer on a home. There is a space between the brick veneer and the sheathing of your home. Ledger boards must be securely fastened to your home's framing.
What is flashing in siding?
Flashing is a type of waterproofing that protects transition points around doors, windows and different materials to keep water from penetrating to the wall behind the installation. Flashing between brick and siding is a relatively similar process on all types of brick to siding transitions, although there may be slight variations based on ...
Can you use rubber flashing on aluminum?
Most of the time, you can use the rubber/plastic flashing. Aluminum metal flashing installs the same way, but you will have to cut the pieces to fit with a miter saw and metal cutting blade, and then silicone and possibly nail them into place, depending on the needs of the flashing manufacturer.
Do you need flashing when siding to brick?
Many homes have a transition point somewhere up the wall where brick gives way to some type of siding, whether it's aluminum panels or cedar shingles. In all cases where there is this type of transition, you must use flashing when going from siding to brick.
Do you need flashing on a brick wall?
Install the flashing before you finish the top of the brick wall, as the flashing must go behind the siding as well as behind and under the top row of bricks that angle outward to cover the top edge with a drip-angle ledge. Mount it on top of any waterproofing layers that have been installed to protect the wall of the home.
Where to lock flashing on brick?
Lock the flashing behind the brick wall and under the bottom of the siding. For setting the flashing properly, you’ll need a good adhesive. Silicone ones will be the best in this regard.
Why flashing a wall?
As it’s made of water-resistant materials like vinyl, sheet metals, and galvanized steel. Therefore, they can prevent water leakage. Masonry walls can also easily absorb rainwater and moisture. When water is stuck behind the wall and siding, there can be severe consequences.
What is flashing on siding?
Flashing is the mechanism of preventing moisture and fluids. So, obviously, it’s related to environmental conditions. The dew point, humidity, temperature, and other factors can have a huge impact on the siding and brick. Your job here is to assess the environment before installing the flashing.
Which is better, metal flashing or vinyl flashing?
For most cases, vinyl flashings are the best choice as they don’t react with other objects. Metal flashing (zinc, lead, aluminum) has a higher rate of reacting to fluids.
What areas of a wall need flashing?
Especially locations that have a downward flow of water inside the wall. It can cover both inside corners and outside corners. Here’s a list of some locations that need flashing more than other locations: Base of Wall. Penetrations.
What is the most common type of flashing?
It’s time to move towards the installation part. You can follow the below-mentioned steps to install the flashing. We’re talking about L-shaped flashing, as that’s the most common option.
Can you flash between brick and siding?
Probably wondering, if you can install flashing between brick and siding ? Yes, it’s possible. Installing flashing is considered to be the best solution to prevent water damage. But this is a complex process. First, you need to think about the environmental conditions and flashing type.
How far should counterflashing extend?
The uphill side of the counterflashing should extend about 2 inches past the corner patch in the pan, where it will be locked into place with the next piece of counterflashing. Keep doing this until you run out of steps.
Where is the long edge solder on a pan?
The long edge is hemmed back toward the block, where it will eventually interlock with a hem on the counterflashing (described below). At the bottom corner of each pan, solder an L-shape piece to the folded edges (inset).
Where are flashings required?
Wall flashings are typically required at locations where the downward flow of water inside the wall would be obstructed or interrupted . Flashings are also used under masonry copings, sills, and other horizontal surfaces. In order to understand how masonry wall flashings work, it is important to first understand the different types of masonry walls.
What are flashings made of?
Often, the flashings extended completely through the wall. These flashing materials were typically made of soft metals such as copper or lead. Sometimes, masonry ledges or projecting elements (often referred to as water tables) deflected water off the façade as it flowed down the face of the building.
How are end dams constructed?
End dams are constructed by cutting and folding the flashing material. Joints are soldered or sealed (see Figure 2).
How do weeps work?
Effective weeps can also be provided by leaving head joints open. However, weeps also create openings where wind-driven rain can enter the wall and thus expose the flashing to more water. The wall flashings have to be installed well to prevent potential water intrusion from creating a problem.
Why are drips opposed to flashings?
Many times, drips are opposed by the designer for aesthetic reasons. When flashings are specified to be terminated within the face of the masonry veneer and not “daylighted” to the exterior, water may flow off of the edge of the flashing and be retained within the wall.
What is a masonry wall?
Masonry walls, which are largely composed of brick, concrete masonry units (CMU), cast stone, and other related units, typically absorb moisture and rain. The masonry industry understands that water penetration through the outer wythe of veneers will occur.
What are load bearing walls made of?
Load-bearing walls performed well as long as it stopped raining before water was absorbed all the way through the mass of the wall. Flashings in these walls typically occurred at junctures of roofs and walls and at parapet locations. Often, the flashings extended completely through the wall. These flashing materials were typically made of soft metals such as copper or lead. Sometimes, masonry ledges or projecting elements (often referred to as water tables) deflected water off the façade as it flowed down the face of the building.
What is a brick course called?
SOLDIER COURSE. Bricks that are set with the narrow side exposed are called soldiers. Bricks laid vertically with its long narrow sides presented (Soldiers) in a row is called a soldier course. Usually used to add visual interest to a masonry structure.
How is a brick joint formed?
This joint is formed naturally by the excess mortar when bricks are squeezed and does not need any special tooling. It is not recommended for exterior walls and the extruded material will weaken and erode over time.
What is mortar on a brick?
The act of placing mortar on one face of a masonry unit with a trowel before is laid. You will want to put as much mortar as possible on the end of the brick.
What is bonding brick?
The method of arranging bricks in a pattern so that the individual units are tied together. Bonding is crucial to eliminate consecutive vertical joints both in the body as well as on the face of the wall, as this will create a weak brick structure. It is also referred as the adhesion between mortar and brick or stone units and when attaching several types of masonry walls by overlapping masonry units.
What is a brick stretcher?
An alternate course of bricks that are composed of one header to one stretcher. It can also have several stretches in a row. Many times, the stretcher and headers will be of different color to create patterns.
What is a brick core?
A masonry unit that has holes or cores in its cross-sectional area with no more than 20 percent of its volume hollow. These cores reduce the weight of the brick and allow for faster firing of the brick.
What side of brick is rounded off?
Top stretcher side corner of the brick is rounded off.
What is the rule for a wall that is not flashed?
Rule No. 3 – A wall without flashing completed properly has a 95 percent chance of leaking as opposed to a wall that is flashed correctly, which has almost no chance of leaking. As a mason contractor you know all of this, so let’s discuss some of the new rule changes.
What is the most common flashing in the United States?
Rubberized asphalt. Rubberized asphalt is the most common flashing on the market today, with several companies breaking up the geography of the United States. The rubberized asphalt, or “Stickie Back,” that is installed commonly is a good, stable material that performs well when installed properly.
How far should mesh be over termination bar?
Placement of the mesh should extend over the termination bar and lap about one inch over the flashing. The last major improvement observed in the sealant and flashing market is that contractors now can obtain answers to their technically based questions, regarding anything masonry.
Does masonry change over time?
As with all things, masonry has rules that will and will not change over time.
Popular Posts:
- 1. which institute is best for medical transcription course in bangalore
- 2. what is financial management course
- 3. what is the best lsat prep course to take
- 4. how to write a college course curriculum
- 5. how long is billing and coding course
- 6. how long is medical assistant course
- 7. what is pmp training course
- 8. what is a course management system
- 9. what is business management course
- 10. how long is hvac course