What is a course bearing?
The course bearing is the bearing you’ll follow to stay on a leg of a course. For example, the course bearing from “B” to “C” is 71 degrees true and 75 degrees magnetic.
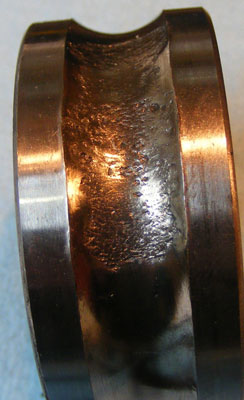
Why do we have to align bearings/shafts insidiously?
I say insidiously because an improperly aligned bearing/shaft can lead a casual or inexperienced inspector to conclude that the former isn’t worn and therefore cleared for another season of use.
What causes shaft bearings to wear out?
Additionally, allowing an accumulation of hard barnacle growth on the shaft forward of the bearing can upset water flow, which leads to increased wear. Shaft bearings rely on a steady, uninterrupted flow of water for lubrication. Hard growth on the shaft forward of the bearing can upset this flow and lead to accelerated wear.
What happens if a bearing is too tight?
The bearing’s fit should offer slight resistance, what’s known as a ‘light interference fit’, it’s unnecessary for it to be extremely tight. If it’s too tight, the bearing could be distorted during installation. If necessary, the bearing’s outer shell could be turned down on a lathe to improve the fit if it’s too tight.
How do you navigate with ocean swell?
Mapping swells to the star compass The directions from which swells come are determined by using celestial clues (the positions of the rising and setting Sun and stars). Swells move in a straight line from one house on the star compass to another house of the same name in the opposite quadrant, 180° away.
What is a good swell period for surfing?
If the surf forecast says 1-3m (3-9ft), then it's usually a good time to go surfing. 3m waves are not appropriate for beginners, but experienced surfers take on waves of incredible height. Under 1 meter, waves are usually more suited to beginner surfers.
Is 2m swell rough?
slight – up to 1.0 metre. moderate – up to 2.0 metres. rough – up to 3.0 metres. very rough – up to 4.5 metres.
What is a good wave height for beginner surfers?
1-2 feet highAs a beginner, you should start by practising on small white water waves (1-2 feet high) and only move on to catching the bigger waves when you feel ready. Not only is this important for your safety, but it will also help you to avoid hostility from other surfers if you get in their way.
Is surfing better in high or low tide?
The best tide for surfing in most cases is low, to an incoming medium tide. Keep in mind low-tide on shallow surf breaks jack the waves up higher, leaving less room between the water's surface and ocean bottom. Always know the area you're surfing and avoid shallow reef and rock obstacles if possible.
What height of waves is considered rough?
Wave explanationsDescriptionHeight (metres)WMO Sea State codeSmooth0.1 - 0.52Slight0.5 - 1.253Moderate1.25 - 2.54Rough2.5 - 456 more rows
Is a 1.5 m swell big?
If the wind is stronger than 15 knots, don't go, if the swell is bigger than 1.5 meters, don't go and if the seas are bigger than 1.5 meters, don't go. The difference between seas and swell.
What is the best swell for boating?
Some boaters use the 30 percent wave height to boat length ratio. If a wave's height is 30 percent of the boat's length, then it is pretty good idea to turn back. However, this is only a rule of thumb.
How many knots is too windy for boating?
So, how windy is too windy for boating? The answer obviously depends on the size of your boat and the size of the waves but in general, wind speeds over 20 knots (23 mph) are too windy for boating. At this wind speed, almost all size boats will be greatly affected, and smaller boats may even be in danger of capsizing.
Are 2 3 foot waves good for beginner surfers?
GOOD WAVE HEIGHT FOR BEGINNER SURFERS? Generally speaking the smaller the better -- but not too small that you can't get moving. This usually means waves in the 1.5 - 2ft range (occasionally 3ft if you're up to it).
Can you surf 1/2 foot waves?
A one- or two-foot wave is usually good for one, maybe two turns. Pick your section wisely, as you may only get one chance to turn–don't blow that chance. “On a tiny wave, a big move is likely to be your last,” says Taj Burrow. “So make sure you've chosen the right spot for it.”
What wind is best for surfing?
offshore windAn offshore wind is the best wind for surfing. It ensures that the waves rolling in are well formed and break cleanly. If you want quality waves then you want an offshore wind. If you are going to go surfing, then make sure you keep an eye on the weather.
How to read a course bearing?
The course bearing is the bearing you’ll follow to stay on a leg of a course. For example, the course bearing from “B” to “C” is 71 degrees true and 75 degrees magnetic. The course bearing from “C” to “D” is 30 degrees true and 34 degrees magnetic. To follow a bearing, point your kayak so your compass reads the course bearing and then paddle while keeping your compass pointed at that bearing. When marking a course bearing on your chart, you can mark true, magnetic or both. Stay consistent or label the bearings. You can also mark a back bearing, which is the bearing to take if traveling the course in the opposite direction. The back bearing is always 180 degrees away from your bearing. While marking bearings on your chart, adding distance saves time later.
How to follow a bearing on a kayak?
To follow a bearing, point your kayak so your compass reads the course bearing and then paddle while keeping your compass pointed at that bearing. When marking a course bearing on your chart, you can mark true, magnetic or both. Stay consistent or label the bearings.
How to find the variation from magnetic north to true north?
If the variation is west, you add the degrees of variation to the true bearing to arrive at magnetic and you subtract the degrees from magnetic to arrive at true. If it’s east variation, you do the opposite. note box]
What is the bearing of a lighthouse?
A bearing is the direction from your location to any distant point given in degrees from north. If you point your compass at a distant lighthouse and the compass reads 56 degrees, then the bearing to the lighthouse is 56 degrees. Read bearings in either true or magnetic.
How far away is the back bearing?
You can also mark a back bearing, which is the bearing to take if traveling the course in the opposite direction. The back bearing is always 180 degrees away from your bearing. While marking bearings on your chart, adding distance saves time later.
What is a course in paddling?
A course is your planned paddling route. It’s usually marked on a map, although you can also just make a mental note. A course can be a straight line going from your point of departure to your destination, or it might consist of two or more legs.
Is the heading the same as the bearing?
When traveling a course, your heading usually is the same as the course bear ing, but it doesn’t have to be . In some situations, like when you’re dealing with wind or current by ferrying, your heading may vary from your course bearing while still staying on course.
Why is it important to take care of bearings?
Taking care of your bearings in a proper manner is an important process to increase their lifespan and enhance bearings performance. Often times when bearings are mishandled, it will lead to premature failure.
How long do bearings last?
While most bearings have a strong resistant to water or damp surfaces, it is still susceptible to rust under extreme condition or when they are exposed to moisture for a long period of time , resulting in water contamination. It is important to note that even a little rust has a huge impact on the lifespan of the bearings. While bearing failure may take a long time, sometimes even up to several years to even be noticeable, the life expectancy of bearings are significantly reduced. Therefore, it is important to keep your bearings sealed in their original unopened package (until needed) and stored in a clean and dry environment.
What happens if you use grease on a bearing?
Applying lower than the recommended amount of grease may increase temperatures and metal contact, leading to increased friction and damaging the bearing through extreme wear. As a result, it leads to early failure in your bearings.
Can grease cause a bearing to fail?
In fact, over-greasing causes even more damage to the bearings than under-greasing. Applying too much grease will lead to heat-build up as there is nowhere for heat to dissipate and along with the internal churning of the bearing, the excessive grease will then travel outside the bearing and hardened on the surface, preventing the entry of any other grease. The restricted lubricant flow and high temperature then results in l ubrication failure and in turn, bearing failure.
How to reduce swelling after rhinoplasty?
Swelling after rhinoplasty can be reduced by keeping the head elevated, which includes while sleeping. Ice packs may also be used to reduce puffiness and discomfort, especially in the first 48 hours after surgery, but should not be used for more than 10 to 15 minutes at a time, and should be wrapped in a clean towel rather than applied directly to skin. While using ice packs, be careful to avoid any sutures and be sure not to move any splints or tapings out of alignment. Swelling can also be reduced by drinking plenty of water and avoiding especially strenuous sports or activities for the first few weeks after surgery. It is okay to be up and active as you feel ready, but take care not to overexert yourself initially. Also, be sure to eat a nutrient-rich diet as you heal. Foods rich in an enzyme called papain, like fresh pineapple or papaya, can help the body eliminate bruises more quickly. Try to avoid salty foods, as they can increase swelling.
How long does it take for a swollen tip to go down?
However, the full result is in the last 10% — where the tip and bridge definition is maximized. This may take 12 to 18 months.
How long does it take for swelling to go down after rhinoplasty?
Every patient is different, so recovery times vary, but generally speaking, most patients can expect to look “normal” after about three to four weeks, with a small amount of residual swelling and tenderness lasting about three months — though it is usually only noticeable to the patient themselves.
Why do you travel to Beverly Hills for rhinoplasty?
To ensure the best quality of care and technique, patients seeking a rhin oplasty often travel for the procedure in order to access the best experts in the industry. Because there are only a handful of expert rhinoplasty plastic surgeons in the country , patients should expect to travel to a location like Beverly Hills for their procedure.
Can you swell up after nose surgery?
Yes . While the nose is obviously the site of the surgery, residual swelling is to be expected in the surrounding areas of the face. You may have bruising and puffiness around your eyes, cheeks, and upper lip in the first couple of weeks after surgery, but most patients find that this resolves fairly quickly, within about the first week, and that they can use cosmetics like concealer to hide any remaining facial bruising if they need to go out in public. About half of patients have no facial bruising at all at 7 days post-op; about 40% have only minimal bruising; and about 10% have moderate bruising. The amount of facial swelling and bruising depends on the complexity of the procedure as well as the individual person — some people simply tend to swell and bruise more easily than others. Regardless, almost all patients can expect any visible signs of facial trauma to have resolved within a few weeks after surgery.
Is it normal for the tip of your nose to swell after rhinoplasty?
Is nose tip swelling normal? Yes, nose tip swelling is completely normal after rhinoplasty. The reason for this is purely anatomical. The skin and soft tissue of the tip of the nose is thick and subateous, and it is also densely adherent to the underlying cartilaginous infrastructure.
How to do partial weight bearing?
Begin by using a scale to see how much pressure is on your affected leg when half of your weight is placed on it. Use your assistive device to stand with slight pressure on your leg. Your physical therapist can help you with progressive partial weight-bearing.
Why is it important to adhere to weight bearing restrictions after surgery?
It is important to closely adhere to your weight-bearing restrictions after surgery or injury because otherwise you can disrupt healing and delay your recovery. These restrictions are meant to protect your body as it is healing.
What is toe touch weight bearing?
Toe-Touch Weight-Bearing. Toe-touch weight-bearing means that only the toes on your operated leg should contact the ground. This is for balance only, however, and thus no significant amount of weight should be placed on your toes. As a result, an assistive device such as a walker or crutches will again be necessary for you to walk.
What happens after lower extremity surgery?
After lower extremity surgery, your orthopedic healthcare provider may limit the amount of weight you can place on your operated leg. This restriction is necessary to provide adequate time for proper bone or tissue healing to occur. It also allows for any hardware that was placed during the surgical procedure to remain in the proper position.
Does Verywell Health use peer reviewed sources?
Verywell Health uses only high-quality sources, including peer-reviewed studies, to support the facts within our articles. Read our editorial process to learn more about how we fact-check and keep our content accurate, reliable, and trustworthy.
Can a doctor limit weight bearing after surgery?
After injury or surgery, your doctor may limit your weight-bearing as things are healing . Take a moment to learn about different weight-bearing restrictions, and work closely with your physical therapist to properly progress your weight-bearing status as directed by your doctor.
What to do if you break your ankle?
After you break your ankle, the doctors will typically order a walking boot for you to wear so that your foot can heal. You must know how to don and take off your boot, as well as keep it clean. This article will teach you how to complete these activities in the most efficient manner possible! You can also learn more about what to expect when wearing a walking boot. Continue reading to learn more!
Why do you need ankle cuffs?
Adjustability in the ankle area is important in case you have swelling. For both men and women, an ankle cuff can be used if you need more room in the boot. The ankle cuff is ideal for people who use their boots for hiking and other activities, especially if the boot does not fit properly.
How to keep your walking boots dry?
If you must be in your walking boot during a shower, keep it dry. This may be accomplished by putting a waterproof plastic bag around the boot. This could also come in useful if you’re out for a rainy stroll. While walking, it’s a good idea to wear thick, moisture-wicking socks. This will prevents sweaty feet from getting inside the boots while also absorbing sweat and keeping the feet dry.
Why do you need a sock liner in your boot?
A sock liner is a thin material that resembles a sock that you insert and wears inside your boots. They insulate your feet from the impact of the boot’s contact with your foot.
What happens if you get wet bootstrapped?
If you have a wet bootstrapped on your foot, your foot is at risk of contracting a fungal infection. Some of these illnesses are hard to cure and can even be fatal. Make sure that you keep your feet dry whenever possible. Do not put your boot on if needed. If this is not feasible, use a pair of cotton socks to cushion the foot inside of the boot.
Can a broken ankle be a debilitating injury?
A broken ankle, sprained ankle, knee injury, or any other injury which led to the need for a walking boot can be extremely debilitating. It can keep you from living life to its full potential, and it robs you of an active lifestyle. Buying the right shoe with the correct orthopedic walking boots technique will go a long way in helping with this injury.
How to anchor a boat safely?
The three simple rules of anchoring etiquette, which will also increase safety in the anchorage, are: 1 Keep as much room between yourself and other boats as is reasonably possible 2 Follow the anchoring method (ie. stern anchor, Bahamian moor, etc.) of the boats that were there before you 3 Leave room for other boats who come after you to anchor in the anchorage
What is the best anchorage technique for a river bar?
In areas that experience fast currents and 180 degree shifts, a common anchoring technique is called the Bahamian moor . This is more common on the east coast, but is also useful in the river bar anchorages frequent along the California, Washington and Oregon coastlines. It is the same technique as setting the stern anchor, except that instead of fixing the second anchor to a clean at the stern, both anchors are run off the bow.
Why is the catenary curve important?
This is important because it determines the angle of pull on the anchor and acts as extra weight and friction on the seafloor. As wind or current increase the boat will move further from the anchor, decreasing the catenary and increasing the angle of pull. In a strong windstorm, when the rode is tight and there is little to no catenary, the amount of rode deployed will determine directly the angle at which the anchor is being pulled.
How does wind affect anchor pull?
As wind or current increase the boat will move further from the anchor, decreasing the catenary and increasing the angle of pull. In a strong windstorm, when the rode is tight and there is little to no catenary, the amount of rode deployed will determine directly the angle at which the anchor is being pulled.
What is the purpose of a bridle on a bow rod?
A bridle offers a sacrificial layer and reduces strain on the bow roller. It also reduces swaying and yawing and the noise of the chain.
How does a boat anchor work?
How a boat anchor works. A boat anchor is a simple device. It is designed such that the more pull force applied in line with the shank; the more the anchor seeks to embed itself in the seabed. However, it is impossible to pull an anchor laterally due to the height or depth of the water between the boat and the anchor.
What type of steel is used for Bruce anchors?
Many of these anchors are available in galvanized steel or a (more expensive) stainless steel option. However, the stainless steel is more for looks and has no impact on anchor holding performance.
Popular Posts:
- 1. which institute is best for medical transcription course in bangalore
- 2. what is financial management course
- 3. what is the best lsat prep course to take
- 4. how to write a college course curriculum
- 5. how long is billing and coding course
- 6. how long is medical assistant course
- 7. what is pmp training course
- 8. what is a course management system
- 9. what is business management course
- 10. how long is hvac course