Easy Laser Obstacle Course
- Secure the Laser Pointer
- Reflect the Laser. Find where the laser meets the wall and tape a mirror where that is. Repeat this step with all three mirrors.
- Adding the Light. Once again, find where the laser meets the wall, but this time put the solar powered light there. ...
- Playing the Game. Once you have all the mirrors and the light set up, you are ready to play. ...
- Contest Info. What did I make?: How did I make it?: I was watching the show The Big Bang Theory, and in the episode they played a game ...
Easy Laser Obstacle Course
- Step 1: Secure the Laser Pointer. Tape down the button on the laser pointer so it stays on and tape it to a stable surface, pointed towards a wall.
- Step 2: Reflect the Laser. Find where the laser meets the wall and tape a mirror where that is. ...
- Step 3: Adding the Light. ...
- Step 4: Playing the Game.
Can you build your own obstacle course?
If you want to build your own obstacle course, you’ve come to the right place. In this post, we will look at some obstacle course inspiration and discuss how to use basic materials to construct this unique equipment. With Kee Klamp fittings and pipe, you’ll soon be on your way to building your very own obstacle course.
Can you change the shape of an obstacle course?
This means you can change the shape and structure of the course to adjust the difficulty. You can also break down these structures to make a portable obstacle course. This is especially great if you want to design a course for a traveling event, like the obstacle courses used in the Spartan Races.
Why create a recycling obstacle course?
The goal was to create an obstacle course that students would love to participate in, all while promoting the importance of recycling. Want to try it yourself? We encourage you to try making any of the individual activities for a gym or field day activity.
What is the recycle warrior obstacle course?
We recently took on this challenge and built our Recycle Warrior obstacle course! The goal was to create an obstacle course that students would love to participate in, all while promoting the importance of recycling. Want to try it yourself? We encourage you to try making any of the individual activities for a gym or field day activity.
How do you make a laser tag?
2:436:02How to Make Your Own Laser Tag - YouTubeYouTubeStart of suggested clipEnd of suggested clipYou would require three volt battery LDR. Two two and three nine zero four transistor LED. And aMoreYou would require three volt battery LDR. Two two and three nine zero four transistor LED. And a potentiometer and three volt battery folder two and three nine zero.
How do you make a maze with string?
0:002:05Let's Play... a Laser Maze game! - YouTubeYouTubeStart of suggested clipEnd of suggested clipYou will need a pair of scissors. And some tape so once you get started you will go ahead and haveMoreYou will need a pair of scissors. And some tape so once you get started you will go ahead and have to measure. Out your string. From side to side in your hallway.
How do you set up a laser maze?
0:001:15How To Play Laser Maze - YouTubeYouTubeStart of suggested clipEnd of suggested clipHere's how to play. Choose a challenge card set up the tokens on the game grid according to the carMoreHere's how to play. Choose a challenge card set up the tokens on the game grid according to the car your. Goal is to figure out where to place the specified tokens.
What is a DIY laser maze?
Tape streamers, ribbon or string in a zigzag pattern across hallway walls to build a maze of “laser beams”. Step 2. Then, challenge them to get through it without touching! This super easy activity can keep them entertained for quite a while.
How do you make a string obstacle course?
0:522:28How to Set Up an Obstacle Course in Your Backyard - YouTubeYouTubeStart of suggested clipEnd of suggested clipPlace a wooden ladder flat on the ground participants run the length of the ladder as fast as theyMorePlace a wooden ladder flat on the ground participants run the length of the ladder as fast as they can by stepping between each of the rungs. Step 3 lay eight hula hoops in a row. And this segment.
How do you make a homemade maze?
DirectionsThe first thing you want to do is map out how you'd like to set up your maze, this way you can figure out where you'd like to cut all your doors in the maze.Next, on your boxes draw a decent size door on the box & cut out with an X-Acto knife.Once you have your doors cut out it's time to connect them all.More items...
Does laser maze need batteries?
You must place all of the tokens speci ed under “ADD TO GRID”. . Always follow the instructions carefully. Use only batteries speci ed and be sure to insert them correctly by matching the + and – polarity markings.
How do you play circuit maze?
0:312:12Circuit Maze Logic Game - YouTubeYouTubeStart of suggested clipEnd of suggested clipYou'll need to work around the starting obstacles as you arrange and orient your pieces to build aMoreYou'll need to work around the starting obstacles as you arrange and orient your pieces to build a complete circuit and solve the challenge.
How do you play the hallway laser maze?
Basically, you're just going to tape the crepe paper on the wall in a zig zag pattern, back and forth, high and low, moving down the hallway. The idea is to create a “maze” that your kids can then work their way through, like the laser mazes you often see on spy movies.
How do you make a laser maze in Minecraft?
0:487:11Laser maze. minecraft command blocks - YouTubeYouTubeStart of suggested clipEnd of suggested clipWe need to get some stairs. And then we can redirect the laser. Like I can place the stairs there weMoreWe need to get some stairs. And then we can redirect the laser. Like I can place the stairs there we go like that and then when I click it if it starts in that position.
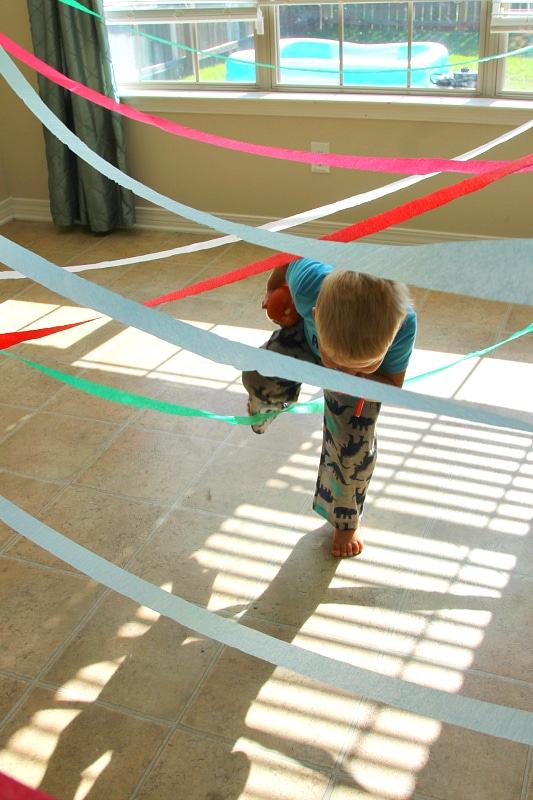
5 Minute Spy Laser Obstacle Course for Kids
Phoenyx has been a cranky pants all week. Daddy comes home today from being out of town all week (YAY!) and he is on his wits end with me I think. So today I decided to use all this crepe paper for something fun.
Create Spy Obstacle (Fake) Laser Course
Charlotte is not home yet to test it out, but here is what we did. For less than $3, we had a good time (and plenty available for new courses later!)
Step 1: Laser Maze
With streamers, a hallway and a little bit of tape, you can make your very own laser maze, extra points for new original ways to cross. This is a super fun activity with varying levels of intensity based on how you set it up to your liking, and is also very entertaining for both children and adults.
Step 2: Cushion Jump
The aim of the game here is to cross as quickly as possible and then go back to finish the rest of the obstacle course. This one is almost too easy to set up and is so much fun, you don't have to use cushions either if you don't want to any soft small item that you can hop onto will do.
Step 3: Dance Floor
All you need for this is painters tape and a tune, outline a square on the ground and decorate to your desire (or not) then, set your music and get ready to boogie,you may want to stay longer than the time you have . This one is very simple and very fun all you have to do is dance for one minute and its such a fun addition to the course.
Step 4: Army Crawl
Pretend you are in the army and crawl under the strings like a soldier, but don't forget to be fast. All you need is some string and tape, make sure it's not too high or too low.
Step 5: Tight "rope" Cross
It may not be a tight rope but it is just as challenging. Grab any pole and lay it on the ground, and with that setup is done. All you have to do is cross it without touching the floor (which is a lot harder than it seems) Make sure to cross fast because this obstacle course is timed and the prize is yours to choose.
Step 6: Finish!
Now that your done you can not only, have fun, be creative but also burn calories while doing it! I hope that you liked this project and that you try it out, remember thought if you cant do all of these or if you have other ideas, then feel free to cater this project to your needs.
Kee Klamp Fittings and Obstacle Courses
Before you design and construct your obstacle course, take some time to think about what you want out of this equipment.
DIY Obstacle Course Ideas
This project was created for the Miami Freerunning and Parkour Academy. It could easily be incorporated into an intense obstacle course. To create a similar project, gather Kee Klamp fittings, pipe, and 30 to 60 Degree Single Socket Tee fittings for added stability. We recommend using a rigid and thick pipe for the longer sections of the course.
How to Build Your Own Obstacle Course
Did you find some inspiration? Great, now let’s get started on the project.
Build Your Own Obstacle Course Today!
We know that it can seem overwhelming to create your own obstacle course. Hopefully, this post helped you see that, with the right tools, creating an obstacle course is possible. Soon you could be achieving your own American Ninja Warrior dreams!
1. The Starting Line
Every obstacle course has a starting point, and we made ours easy with a recycled cardboard platform with an arrow on top to kick things off. Next to the starting mark, we had a pile of empty plastic bottles that were ready to be recycled. Students had to have one foot on the cardboard platform before the timer could start.
2. The Leap Pad Challenge
Create platforms with reclaimed or scrap wood. The goal of this section is to have students leap from one platform to the next, balancing with their plastic bottle in hand the entire time. Decorate the platforms with recycling images or your school colors!
3. The Over-Under Race
Recycled materials make up the entire over-under challenge. The cans are the posts, and the bar across the top is made from plastic bottles. We just glued them all together to make them secure. To help hold it into place, we used two-liter bottles filled with sand.
4. The Balance Beam
Here’s another one you can make with reclaimed materials. Keep it safe and secure, but you can use a fallen log or pallets to create this for your obstacle course.
5. The Roundabout
The roundabout can be done in so many ways. It’s basically a way to bring in a challenge where students have to weave from one section to the next.
6. The Cardboard Tunnel
Every school can find extra cardboard to use. This cardboard tunnel is made of several different boxes to give students a section to crawl through. Remember, students still have to be holding their plastic bottle. Attaching all the boxes together really makes it challenging (and fun) for students.
7. The Finish Line
Every good race has a good finish. Since we wanted to spread the message of how important it is to recycle, we put a recycling bin at the end of the course. After they made their way through the tunnel, students dunked their bottles into the bin.
Popular Posts:
- 1. which institute is best for medical transcription course in bangalore
- 2. what is financial management course
- 3. what is the best lsat prep course to take
- 4. how to write a college course curriculum
- 5. how long is billing and coding course
- 6. how long is medical assistant course
- 7. what is pmp training course
- 8. what is a course management system
- 9. what is business management course
- 10. how long is hvac course