To make coarse dirt, place 2 dirt and 2 gravel in the 3x3 crafting grid. When making coarse dirt, it is important that the dirt and gravel are placed in the exact pattern as the image below. In the first row, there should be 1 dirt in the first box and 1 gravel in the second box.

2:17
20:37
What you'll do is click create a course. And under course type you'll select gravel unpaved cycling.MoreWhat you'll do is click create a course. And under course type you'll select gravel unpaved cycling.
How to build a gravel path the right way?
Apr 01, 2017 · Once you have your measurements, you’ll need to dig up grass and topsoil along your future pathway. Dig up three inches of topsoil for every layer of gravel that you plan to put down. Adding three layers of gravel is pretty standard, so consider this layering before you place an order for gravel.
Is gravel a good choice for a pathway?
May 24, 2016 · How to make gravel and sand The Gravel and Sand Making Flowsheet. Depending on the type of equipment used for excavating the gravel, the method of transporting material from the pit to the plant is between conveyors, trucks, or where size permits, pumps and pipe lines. In a conveyor system the use of a movable feed hopper equipped with a reciprocating feeder and a …
How much gravel do I need for my project?
Nov 06, 2021 · How to Build an Easy Gravel Path Step 1: Dig a Trench. Mark your path's borders with string, rope or line-marking spray paint. Take one final look to... Step 2: Lay Down Your Base. Pour the crushed stone base in the trench and then spread it around by raking it …
How is extensive pit run gravel processed?
Apr 19, 2016 · Step One – Excavation. You can’t just dump a few wheelbarrows of gravel on the ground and call it a day. When we do a gravel path for a client project we dig down 4-6 inches. That lets us eliminate the sod and/or plant matter in the top few inches, and it allows us to create a cleanly defined shape for the path.
How do you make gravel?
0:00
2:45
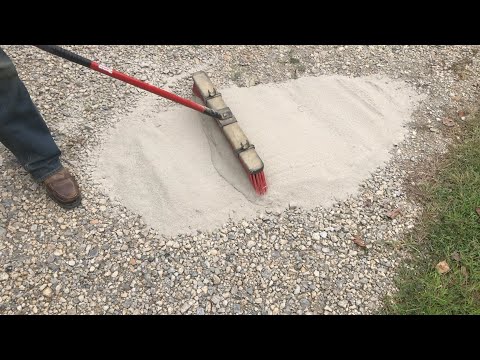
And a chisel nice chisel and safety glasses and yeah just hammer a little rock and the pieces willMoreAnd a chisel nice chisel and safety glasses and yeah just hammer a little rock and the pieces will just fall. Off. That's how you make gravel.
How do you make a level gravel pad?
- On level ground, stake out your gravel pad site, leaving at least 1 foot on every side of your building. ...
- Remove the top 4 inches of grass and soil.
- Now you need to make temporary forms from which to screed (level) the gravel. ...
- Fill the site with gravel.
- Using another 2×4 to span across the forms, level off the gravel.
How do you harden a gravel driveway?
0:01
2:47
We have a gravel driveway but to make it more resilient we're going to put concrete and brush itMoreWe have a gravel driveway but to make it more resilient we're going to put concrete and brush it into the gravel it'll make it stronger more durable flatter.
What is the cheapest gravel for a driveway?
Cheapest gravel for driveways. The cheapest gravel for driveways is crusher run, crushed shells, crushed concrete, slate chips, recycled asphalt, and pea gravel, which all cost $15 to $30 per yard, or less than $1 per square foot when purchased in bulk from a quarry.Aug 18, 2021
How do you anchor a shed into a gravel?

How to Properly Anchor a Shed: The Only Guide You Need
- Drill or dig the holes, tamp some gravel into the bottom.
- Slide a sonotube in to form it up.
- Level it to the needed height, and fill it with concrete.
- Set a galvanized anchor bracket in before the concrete sets.
How many inches of gravel do you need for a shed?
In general, 4” to 6” is a good depth range for a gravel shed foundation.
What can I use to bind gravel?
Apply EasiHold to gravel paths with stones which are 1mm-10mm in size to create a solid surface ideal for supporting pedestrian traffic. EasiHold can simply be poured over the top to provide an effective and stylish walkway.Jun 26, 2020
What is gravel Lok?
Gravel-Lok is a natural stone porous paving system. Gravel-Lok is a single-component, moisture-curing liquid scientifically designed to bond together a wide variety of aggregates. The result is a permeable and durable natural stone pavement system.
How many inches deep should a gravel driveway be?
A standard driveway is between 12 and 18 inches deep.
Each of these gravel layers is a minimum of four inches deep, and some folks recommend making each layer as much as six inches. If you have a large area to dig out for your new driveway, the idea of a shovel and wheelbarrow may not be very appealing at this point.May 28, 2021
Each of these gravel layers is a minimum of four inches deep, and some folks recommend making each layer as much as six inches. If you have a large area to dig out for your new driveway, the idea of a shovel and wheelbarrow may not be very appealing at this point.May 28, 2021
How much will a ton of gravel cover?
100 square feet
Understanding Size and Coverage
Using 2 inches for the depth, the following measurements are a guide to the amount of gravel coverage per ton: 1/4 to 1/2 inch gravel, 100 square feet per ton; 1/2 to 1 inch gravel, 90 square feet per ton; and 1 1/2 to 2 inches gravel, 80 square feet per ton.
Using 2 inches for the depth, the following measurements are a guide to the amount of gravel coverage per ton: 1/4 to 1/2 inch gravel, 100 square feet per ton; 1/2 to 1 inch gravel, 90 square feet per ton; and 1 1/2 to 2 inches gravel, 80 square feet per ton.
How many square feet will 5 tons of gravel cover?
How much area does 5 tons of gravel cover:- typically, 5 tons of gravel will cover approximately 540 square feet or 60 square yard or 50 square metres area for standard 2 inch depth. A ton of gravel cover around 108 sq ft area for 2 inch depth, so 5 tons of gravel = 108 × 5 = 540 sq ft coverage.
Is gravel driveway cheaper than concrete?
Is a gravel driveway cheaper than a concrete one? A gravel driveway is a more budget-friendly option than paving with concrete, which runs from $4 to $15 per square foot.Apr 6, 2022
Is gravel good for a pathway?
Gravel is a very natural looking material for pathways… more so than concrete or asphalt.
What is dense grade gravel?
Another rock consideration is getting what is called “dense-grade gravel” which has rock dust included in the mix. This dust operates as a cohesive agent so the rocks stay in place (source: Gardening Channel).
What are the disadvantages of gravel?
Disadvantages of Gravel for Paths and Driveways 1 Maintenance: You will need to maintain it. At some point you’ll need to add new gravel where it thins out. You also need to sweep displaced gravel back into place. 2 Appearance: While it has a natural look, which can be an advantage, perhaps you don’t like the look of a less permanent option for your driveway. It’s not as “clean-looking” as an asphalt or concrete driveway (especially if you compare it to stamped concrete which can look amazing).
What are the benefits of gravel?
Benefits of Gravel Walkways and Paths 1 Costs much less than concrete or asphalt. See out cost comparison below (huge savings0. 2 Gravel is also less permanent. If you want it to be! In other words, when you pave, your path will be there forever, unless you have it ripped up by pros with large machines. 3 You can modify it. When you choose a gravel-style path, you’ll be free to change it in the future if you want to, just by gathering the gravel, removing the underlay and covering the path with sod or grass seed. You won’t be locked in. However, if you do want to keep the gravel pathway intact over the long term, it will be easy to do so, as gravel is really pretty durable and low-maintenance! 4 Looks Natural. Gravel is a very natural looking material for pathways… more so than concrete or asphalt.
What is gravel walkway?
A gravel walkway is a perfect type of path material for yards, gardens. It’s also a viable option for driveways, especially long driveways. They’re less expensive, easy to maintain and when done right, look fabulous. Consider many peaceful zen gardens use gravel paths extensively.
Why do you slam on the brakes?
You slam on the brakes to slow down and settle in for a bumpy ride. Nobody likes driving long distances on a gravel road, but they’re used in low-traffic areas because they cost so much less than asphalt.
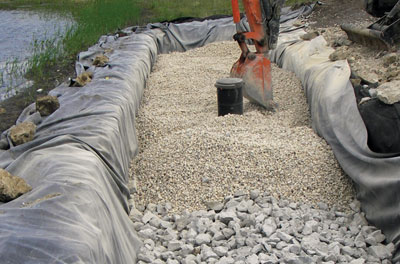
The Gravel and Sand Making Flowsheet
Depending on the type of equipment used for excavating the gravel, the method of transporting material from the pit to the plant is between conveyors, trucks, or where size permits, pumps and pipe lines.
CRUSHING
The field conveyor system transports the pit run gravel to a single deck Heavy Duty Vibrating Screen to scalp off the plus 2-inch material. A Jaw Crusher with a setting of 2 – inches receives the screen oversize.
SCRUBBING AND SIZING
The minus 1½- inch material is conveyed to a Rotary Scrubber where water is added. The intense action created by the tumbling of rock particles thoroughly disintegrates the clay fraction and prepares the material for final sizing. The scrubber discharge is screened at ½- inch to produce a 1½” x ½” roadstone product which is stockpiled.
What is a gravel path?
A gravel path is a brilliantly simple DIY yard addition, allowing you to guide foot traffic around your landscaping so people can enjoy your plants without stepping on them. Best of all, a gravel garden path isn't just easy to install — it's also incredibly budget friendly, doesn't need any special drainage, feels soft to walk on ...
How deep should a gravel path be?
How to Install a Gravel Path. The great thing about gravel paths is because they only go down about 4 inches deep, the installation process is fairly simple. In fact, many projects can be finished in only one day. Advertisement.
How wide should a garden path be?
Most garden paths are 3 to 4 feet wide, and they should always be at least 1 1/2 feet wide for comfortable walking. On the other hand, while they can be as wide as you like, a path that is more than 4 feet wide may look too big for some gardens.
Do you have to dig a deep trench for gravel?
Although gravel paths don't require you to dig very deep, it's still a good idea to call 811—the national before-you-dig hotline—to check for utility lines that may be buried where you're digging.
How to make a sandstone sandstone sandstone?
Step 1: Dig a Trench. Mark your path's borders with string, rope or line-marking spray paint. Take one final look to make sure you like the way it looks—this is your last chance to change the layout before you start digging. Use a square-edged spade to dig a trench about 4 inches deep.
How thick is crushed stone?
Pour the crushed stone base in the trench and then spread it around by raking it until it's even and around 2 1/2 inches thick. Lightly dampen the stone base with water to minimize dust and then tamp down the stone.
Who is Jill Harness?
Jill Harness is a blogger with experience covering architecture, design and decor trends from around the globe. As she lives in what would politely be called a "fixer upper," she is particularly interested in writing about DIY projects and repairs. Most of her home design writing can be found at www.homesandhues.com. You can find out more about Jill's experience and learn how to contact her through her website, www.jillharness.com.
Step One – Excavation
You can’t just dump a few wheelbarrows of gravel on the ground and call it a day. When we do a gravel path for a client project we dig down 4-6 inches. That lets us eliminate the sod and/or plant matter in the top few inches, and it allows us to create a cleanly defined shape for the path.
Step Two – The Prep
Once the path is excavated out, we run a plate compactor over the soil to give us a solid sub-base. We then cover the bottom with a woven geotextile fabric to keep the soil and the base layer separate – just like you would when starting a paver walk.
Step Three – The Base Layer
Do you know why a poorly installed pea gravel path (or patio, or driveway) feels like you’re slogging through beach sand? It’s because a lot of people have zero clue how to build a gravel path. Pea gravel is rounded and doesn’t interlock, so you really are moving the full depth of the path with every step.
Step Four – The Pretty Stuff
We finish off the pathway with our decorative stone of choice. That can be pea gravel, #8 stone, or whatever works for the look you’re trying to achieve. If we’re using an angular stone like ⅜” chip gravel (#8) and it’s going to be a high traffic area, we’ll run the compactor over it a few times.
Can you mix pea gravel with other stones?
There are different ways to create a pea gravel patio. Because of the versatility of pea gravel, it can be mixed with any other stones or landscaping material to produce a patio design which suits your taste. Majority of these gravel patio variations require a level foundation and uses the “dry laying” method.
Is gravel good for a patio?
When gravel is used with plants or in a garden bed along your patio, gravel traps moisture thus reflecting heat better. It is a great alternative to wood mulch as soil covering. Improves the value of your home. A gravel patio is a stunning addition to any garden which improves the value of your home at a low cost.
What is a pea gravel patio?
A pea gravel patio is a treatment for an outdoor space or paved area adjoined to a house wherein it is mainly covered with pea gravel. There are different ways to create a pea gravel patio. Sometimes it is mixed with other materials such as pavers, bricks, slate or flagstone to add an visual appeal.
Can you put a fire pit on a gravel patio?
If you want to utilize your backyard for a grill-out or to catch warmth during cold seasons then you may add a fire pit to your gravel patio. Usually circular in shape and made up of stones, the fire pit acts as the central feature of the patio.
How much does pea gravel cost?
Plain pea gravel costs around $30 to $35 per cubic yard or $40 to $45 per ton. If you prefer the colored variety, consider an additional amount of $20 to $50 to your cost.
What is brick made of?
Bricks are typically small sun dried rectangular blocks which are made up of clay. It is commonly used as building material for walls and walkways. Brick can be laid close together while pavers on the other hand interlock together and are available in a variety of shapes and sizes.
How much gravel do I need?
Step one is establishing the volume of gravel needed. It is equal to the volume of an excavation, and you can do it in the following way:
How much is a yard of gravel?
To calculate the weight of the material, you simply have to multiply the volume by the density. Fortunately you don't have to remember the density of gravel - our calculator sets this value for you by default. Of course, if you decide to use some unusual aggregate, change the density as you need; this function is available in the Advanced mode.
Gravel estimator - how to calculate landscape gravel quantity?
Let's deal with a real-life situation. Imagine that you have just built your beautiful house. You want to cover it with a roof of warm red tiles. Our roofing and roof pitch calculators will help you with that. It would be a shame to buy too much, or, even worse - not enough materials and have to go back to the home improvement store.
Popular Posts:
- 1. which institute is best for medical transcription course in bangalore
- 2. what is financial management course
- 3. what is the best lsat prep course to take
- 4. how to write a college course curriculum
- 5. how long is billing and coding course
- 6. how long is medical assistant course
- 7. what is pmp training course
- 8. what is a course management system
- 9. what is business management course
- 10. how long is hvac course