Easy Laser Obstacle Course
- Step 1: Secure the Laser Pointer.
- Step 2: Reflect the Laser. Find where the laser meets the wall and tape a mirror where that is. Repeat this step with...
- Step 3: Adding the Light. Once again, find where the laser meets the wall, but this time put the solar powered light...
- Step 4: Playing the Game. Once you have all the mirrors and the light...

0:10
5:41
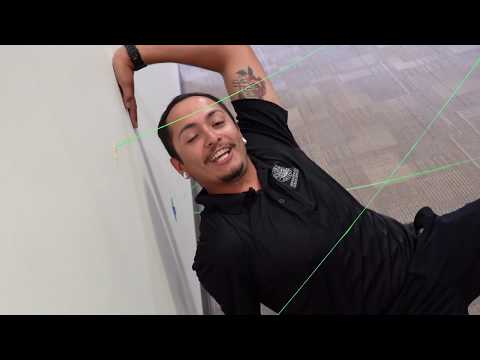
I just have regular old painters tape but if you don't have that you can just use scotch tape justMoreI just have regular old painters tape but if you don't have that you can just use scotch tape just try and make sure that it won't take your paint off your walls.
How to create an obstacle course?
Easy Laser Obstacle Course Step 1: Secure the Laser Pointer. Step 2: Reflect the Laser. Find where the laser meets the wall and tape a mirror where that is. Repeat this step with... Step 3: Adding the Light. Once again, find where the laser meets …
What is the recycle warrior obstacle course?
Well, put down the popcorn and put your money where your mouth is and try it out for real. Except for fake, because lasers are expensive. Instead try it out by setting up red yarn all over your living room. If you want to raise the stakes, design the course to lead up to the remote and let whoever gets to it first have control over the TV for ...
Do I need any legal protection for my obstacle course?
Look into photo diodes(dirt cheap) and hook one up to relay that controls alarms or buzzers. As for the course, mirrors with lasers that point at the photo diode. However this game may not work because the spray they use in the clip might be enough to set off the relay. See mythbusters episode on spy myths to learn more
What are the best materials for an obstacle course?
Apr 28, 2015 · Create Spy Obstacle (Fake) Laser Course. Charlotte is not home yet to test it out, but here is what we did. For less than $3, we had a good time (and plenty available for new courses later!) Tape your Crepe paper to the walls from one end to the other, taking care to create a lot of high and lows. Then let loose~!
How can I make a laser beam at home?

Method One: Building a Laser from a Kit
- A driver circuit. (This is sometimes sold separately from the other components.) Look for a driver circuit that lets you adjust the current.
- A laser diode.
- An adjustable lens of either glass or plastic. Typically, the diode and lens are packaged together in a small tube.
What is a DIY laser maze?
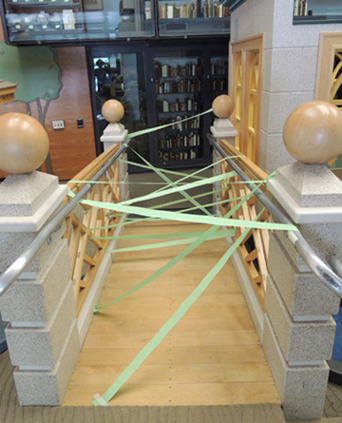
Tape streamers, ribbon or string in a zigzag pattern across hallway walls to build a maze of “laser beams”. Step 2. Then, challenge them to get through it without touching! This super easy activity can keep them entertained for quite a while.
How do you make a maze with string?
0:00
2:05
You will need a pair of scissors. And some tape so once you get started you will go ahead and haveMoreYou will need a pair of scissors. And some tape so once you get started you will go ahead and have to measure. Out your string. From side to side in your hallway.
What is laser maze challenge?
In the classic Laser Maze Challenge® mode, players must draw on their speed, agility, and balance to navigate through a field of lasers as quickly as possible, while engaging Mission Objectives along the way. If any laser beams are broken, a time penalty is added to the player's score.
What is hallway laser maze?
Basically, you're just going to tape the crepe paper on the wall in a zig zag pattern, back and forth, high and low, moving down the hallway. The idea is to create a “maze” that your kids can then work their way through, like the laser mazes you often see on spy movies.
What is a string maze?
Transform a simple string or wool into an obstacle course that will have your family twisting and turning their way to secret treasure. Why a String Laser Maze? In the movies, you often see spies go through extreme obstacle course to get where they need to go.
Are laser mazes real?
As an entertainment venue, laser mazes first hit the US market in 2002 but have only recently caught on as a viable, affordable, and highly profitable attraction.
What kind of batteries does laser maze use?
Product information
| Product Dimensions | 11 x 3 x 10 inches |
|---|---|
| ASIN | B071X6YSJZ |
| Item model number | 44001014 |
| Manufacturer recommended age | 8 years and up |
| Batteries | 2 CR123A batteries required. (included) |
How do you play circuit maze?
Circuit Maze™ is an electricity puzzle game. To play, you build a circuit pathway across the Game Grid from Start to Finish. When you complete your circuit and light up the designated Beacons, YOU WIN! Circuit Maze is challenging and fun.
5 Minute Spy Laser Obstacle Course for Kids
Phoenyx has been a cranky pants all week. Daddy comes home today from being out of town all week (YAY!) and he is on his wits end with me I think. So today I decided to use all this crepe paper for something fun.
Create Spy Obstacle (Fake) Laser Course
Charlotte is not home yet to test it out, but here is what we did. For less than $3, we had a good time (and plenty available for new courses later!)
What are some good ways to make an obstacle course?
Consider inflatable obstacles . A safe and easy option for creating an obstacle course is to make use of inflatable obstacles. Since these obstacles are inflatable they pose a low risk of injury and can add an appealing and lighthearted feeling to your obstacle course.
What is the best place to build an obstacle course?
Look around for the best space available to you for your obstacle course. Hills might be obstacles themselves and can add difficulty to your course. Flat areas are a great location if you plan on building obstacles yourself that need to be level.
How to place obstacles on a course?
Place them according to plan. Having assembled your obstacles you can begin to place them according to your obstacle course layout plan. Place the obstacles where you planed them and evaluate their position before opening up our course to others.
How to overcome obstacles?
Including teamwork can be a great way to get your participants working together to overcome the obstacle course.
What are some challenges to add to a golf course?
Salmon runs, quad steps, and warp walls are all challenging obstacles you can add to your course.
How to test agility?
Running around a series of cones, like a skier slaloming, can be a good test of agility. Try tying small threads with bells attached to them just off the ground. Participants have to step around them without ringing the bells.
Do you need to build an obstacle course for your friends?
Building a simple obstacle course for your friends and family on the other hand will not require such steps.
What is the most important part of a DIY obstacle course?
The most important part of a DIY obstacle course is starting and ending it the right way. A good setup will engage children more and they'll have a lot of fun making their way through the maze of activities.
What is fun obstacle course?
A fun obstacle course requires movement and keeping children quick on their feet so they can complete the course in record time. Getting their heart pumping during the course is a great form of physical activity as well.
What is a laser maze?
Children enjoy stepping up to the plate and trying to beat a mental and physical challenge and having both in one activity is awesome! A laser maze is a simple indoor activity to add to an obstacle course.
How long does it take to build an obstacle course?
Depending on your design, it should only take a few hours to get your obstacle course up and running.
What do you need to assemble a Kee Klamp?
In most cases, all you will need to assemble your project is an Allen Wrench or hex key.
What do you need to make a seesaw balance?
You really just need some wood planks, pipe, 90 Degree Elbow fittings, and Single Socket Tee fittings.
Can you build an obstacle course on your own?
Have you considered building your own obstacle course? Sure, this type of project might seem impossible to complete on your own. But with the right materials, it’s actually easier than you think. Obstacle courses are fun for kids and can even be used as a team-building tool for adults.
Can you break down a Spartan race course?
You can also break down these structures to make a portable obstacle course. This is especially great if you want to design a course for a traveling event, like the obstacle courses used in the Spartan Races.
What is the goal of the Recycle Warrior obstacle course?
We recently took on this challenge and built our Recycle Warrior obstacle course! The goal was to create an obstacle course that students would love to participate in, all while promoting the importance of recycling.
What are the materials used in the Over Under Challenge?
Recycled materials make up the entire over-under challenge. The cans are the posts, and the bar across the top is made from plastic bottles. We just glued them all together to make them secure. To help hold it into place, we used two-liter bottles filled with sand. The bottles across the top balance gently on the cans, so they will move if students brush up against them. This adds to the fun, though! If someone knocks one off, you can decide to deduct points or add on to their race time. (We think a five-second penalty works.)
Why do we put a recycling bin at the end of the race?
Every good race has a good finish. Since we wanted to spread the message of how important it is to recycle, we put a recycling bin at the end of the course. After they made their way through the tunnel, students dunked their bottles into the bin. By having one with a small opening, like the one pictured here, it even added a bit of a challenge to the end!
What is a recycle rally?
Recycle Rally is a free nationwide program that directly benefits K–12 schools and students by providing valuable incentives and resources to help make recycling easy, fun, and rewarding.
What is roundabout in school?
The roundabout can be done in so many ways. It’s basically a way to bring in a challenge where students have to weave from one section to the next.
What can you make with reclaimed materials?
The Balance Beam. Here’s another one you can make with reclaimed materials. Keep it safe and secure, but you can use a fallen log or pallets to create this for your obstacle course. Make It Simple: If you’re not able to find materials to make a true balance beam, then create something on the floor using tape!
Can you put a recycling bin in the end of a classroom?
It really can be whatever you have. Just make sure students know that the items will go to the recycling bin at the end!
Popular Posts:
- 1. which institute is best for medical transcription course in bangalore
- 2. what is financial management course
- 3. what is the best lsat prep course to take
- 4. how to write a college course curriculum
- 5. how long is billing and coding course
- 6. how long is medical assistant course
- 7. what is pmp training course
- 8. what is a course management system
- 9. what is business management course
- 10. how long is hvac course