How to make a remote control car at home?
Jan 13, 2020 · On hard surfaces, find a few level skateboard ramps and place them a few feet from each other so that each car can land on the declined ramp to help its shocks last longer. If you really want to put in the extra work, add texture to the course with cut areas of Astroturf or carpet in patches. Now it's time to race your RC cars.
How do I program an Arduino to operate a remote car?
Jan 08, 2021 · Enthusiasts of off-road remote control cars enjoy putting their vehicles through their paces. In backyards, basements, sheds and warehouses, the most devoted construct elaborate obstacle courses out of DIY materials, which looks like a fun pandemic pastime. A company called Cross-RC has built the nuttiest and most comprehensive we've seen.
Can You Make your own RC track?
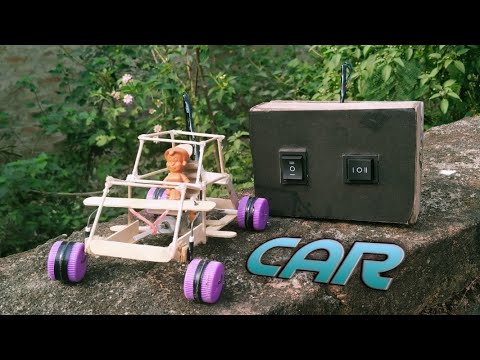
Cut a wooden stick and make a hole at the center using mini USB drill. Insert the thick wire through the hole and fix it using super glue. Cut few pieces of ice cream sticks as shown in the image and make holes at the 3/4th center point. Assemble the pieces together and attach it to the car base as shown in the image above.
How does the Arduino car test program work?
May 29, 2015 · TechReviewHD :DIY Remote Control Car - How to Make Simple Remote Control Car - Make at Home - 4x4 RC Car - Super Easy- Super Fast - Low Cost - High Performan...
How do you make an obstacle course for a remote control car?
2:1215:56RC Car Backyard Obstacle Course Challenge! - YouTubeYouTubeStart of suggested clipEnd of suggested clipUp and over this whole wooden platform. Check this out these are like atv ramps for a trailer youMoreUp and over this whole wooden platform. Check this out these are like atv ramps for a trailer you have to make it down with your rc.
Can you make your own remote control car?
You can build your own RC car using a kit or from scratch. An RC kit comes with everything you'll need to build your car and there are many different models, so you can choose the type of car that you want to build. You can purchase a kit at your local hobby shop or find one online.
How do I make a scale crawler course?
1:0210:07Building a Lightweight Indoor Crawler Course from garbage - YouTubeYouTubeStart of suggested clipEnd of suggested clipAnd fake 3d printed rocks. And little desert plants and things that we're going to use to createMoreAnd fake 3d printed rocks. And little desert plants and things that we're going to use to create this crawler. Course i also have amazon boxes foam from flat pack furniture.
How do you make a backyard RC rock crawler course?
0:007:44New RC Rock Crawler Backyard Obstacle Course Build! - YouTubeYouTubeStart of suggested clipEnd of suggested clipWe are coming up at somewhere around 16 inches wide. You'll see the vehicle come up and then you seeMoreWe are coming up at somewhere around 16 inches wide. You'll see the vehicle come up and then you see this twist. Happening here. So it's slowly gradually twisting over gonna create a side hill.
How do you make a moving car?
2:444:20How to Build a Toy Car - Science Project - YouTubeYouTubeStart of suggested clipEnd of suggested clipOne end of a rubber band to one of your axles. And hook the other end on your chassis. When you windMoreOne end of a rubber band to one of your axles. And hook the other end on your chassis. When you wind the axle up it will stretch the rubber band. And when you release it'll make the wheel spin.
Step 1: Watch the Video
A video is a wonderful tool that provides deep insight to the procedure and makes it easy to understand. However, it is also recommended to visit next steps for additional details and images.
Step 4: Make Steering Mechanism
Cut few circles from a cardboard and paste them together over eachother like a stack.
Step 5: Make Cardboard Wheels
Draw three circles equal to the diameter of 1.5" on a piece of cardboard.
Step 7: Connect the Components
Take a high rpm DC motor and attach a small plastic gear over the motor shaft.
Step 8: Make Body Parts
Make the Front fender from the cardboard and attach it to the car using super glue.
Calculating MPH
We wanted to find out who could race the Hot Wheels Ballistic Racer remote control vehicle the fastest, so we set up a sort of “drag strip” to calculate the speed.
Surface Testers
Test how the Hot Wheels Ballistik Racer rides on different surfaces. Try timing to figure out speed on tracks with different textures. Here are some fun surfaces to try:
Stunt Driving
While we were out on the hill behind our house driving the Ballistik Racer through the dirt and gravel, we tried driving it through small “trenches” and over mounds and rock ramps. Try different button combinations and see what happens to the vehicle when you use each button.
Step 1: CAD: Designing the Base
When designing the base, there are a few points to consider. One of the main challenges is spacing and ensuring everything is able to fit including wires. Common designs including starting with a circle or square and developing a base that accommodates your needs.
Step 2: Assembly: Putting Everything Together
Using 4 x M3-6 screws, we can first attach the caster wheel. When attaching the wheel, we need to ensure that the wheel is facing the opposite direction of the makeshift standoffs we created for the Arduino. If the TT motors do not have wires already soldered onto the leads, then solder the wires prior to fixing them to the base.
Step 3: Wiring: Connecting Everything Together
Using the diagram above, we can wire everything together. The batteries will first be wired to the positive and negative terminals of the breadboard. Ensure to power rails on both sides of the breadboard as we will be using these for the IR sensor and the motor driver.
Step 4: Software: Test Program
With the wiring done, we can ensure that everything is working as intended. Below I have provided a test program, that will move the robot forward, backward, turn left, and turn right with 3 second intervals between each movement. Using this test, we can determine if we have wired anything incorrectly.
Step 5: Software: Remote Control Operation
Once the motors have been tested and everything has been properly assembled. We first need to install the IRremote.h library. This will allow us to directly interface with the IR remote and IR sensor, allowing us to read and interpret values from the IR remote. To install the library we need to navigate to
Popular Posts:
- 1. which institute is best for medical transcription course in bangalore
- 2. what is financial management course
- 3. what is the best lsat prep course to take
- 4. how to write a college course curriculum
- 5. how long is billing and coding course
- 6. how long is medical assistant course
- 7. what is pmp training course
- 8. what is a course management system
- 9. what is business management course
- 10. how long is hvac course