- Create a Course Page Creating a course starts by going to LearnDash LMS > Courses. ...
- Create Sections Click on the Builder link at the top left, and you’ll land on the builder view. ...
- Create Lessons The next step in structuring your course is to add lessons under the sections. ...
- Break Lessons into Topics (Optional) If you want to organize your course even further, you can do so by using topics. ...
- Create Quizzes (Optional) One way to add more user engagement to courses is to have quizzes. ...
- Set Assignments (Optional) Assignments help your students to reinforce what they have learned. ...
- How to Sell Your Course LearnDash also supports payment gateways, like Stripe, 2Checkout, or WooCommerce. ...
- How to Access Your Course Now it’s time to publish your course to test how students will see and access your training. ...
- Setting Up the Login Screen When you click the Login link, you will see a standard WordPress login screen. ...
- Displaying the Course Page with CourseGrid Add-on
Where to Add a Course Page Content
- Navigate to LEARNDASH LMS > COURSES.
- Click on the course you'd like to edit.
- You will automatically land on the Course page tab.
- You can immediately start adding your course description.
7 days ago
How do I add courses to my learndash site?
Mar 21, 2022 · The first thing you will need to do is to create an account/profile page. This is done by adding the following LearnDash shortcode: [ld_profile] This will present the user with all the information related to the courses they have access to, including progress, performance, obtained points, previous quiz answers, and certificates.
Can you customize the login screen on learndash?
Nov 23, 2019 · Navigate to Templates > Theme Builder Click Add New Choose a Single template Choose Course as the post type (not showing up? see this tutorial) Give your template a name & click Create Template Now you’re going to use 3 different Elementor widgets to …
How do I use learndash shortcodes&blocks?
LearnDash does a good job of this by allowing you to create lessons and topics under a course. Interactive Course Content and Media. Out of the box, you can create your course content by using the WordPress editor. Enhance course, lesson and topic pages with Page Builders.
How do I create or edit a course?
Oct 20, 2021 · Create a Course Page Creating a course starts by going to LearnDash LMS > Courses. On the page, click on the Add your first Course button: On the next screen, you can enter the course title and add a description under it. You can also access the course settings on …
How do I create a LearnDash registration page?
Enable LearnDash Login & Registration
You need to enable the Login & Registration option in the LearnDash general settings. IMPORTANT: You need to enable registration for your WordPress site by selecting the Anyone can register checkbox located under SETTINGS > GENERAL (only necessary if you want to allow registration)Mar 21, 2022
You need to enable the Login & Registration option in the LearnDash general settings. IMPORTANT: You need to enable registration for your WordPress site by selecting the Anyone can register checkbox located under SETTINGS > GENERAL (only necessary if you want to allow registration)Mar 21, 2022
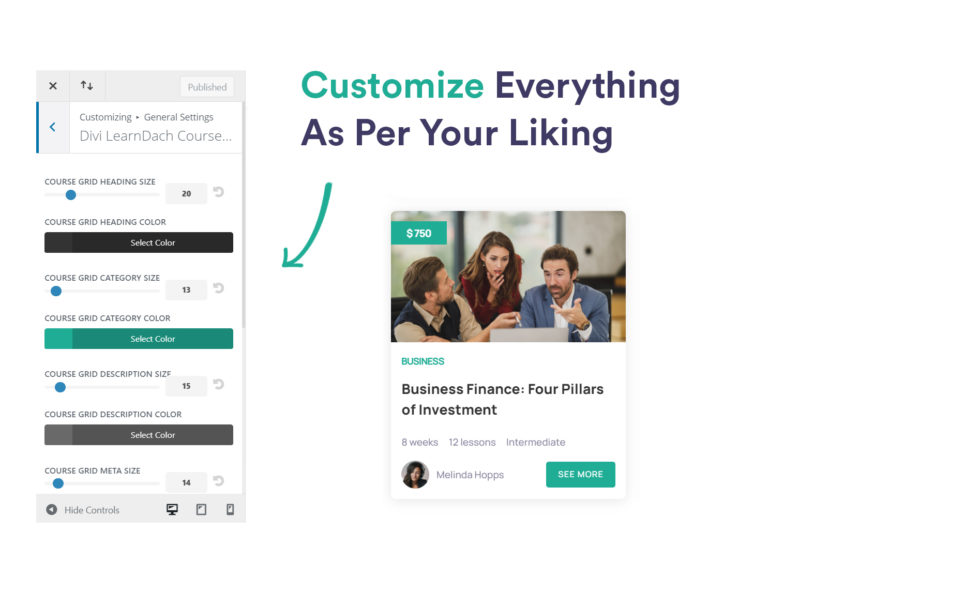
How do I customize LearnDash?
Simply install and activate. Once activated, you will find an APPEARANCE tab located under LEARNDASH LMS > SETTINGS. From here you can select a pre-made template and further customize the templates to your heart's content! Click Here to view screenshots of the pre-made templates.May 12, 2015
How do I create an online course using LearnDash on WordPress?
9:30
2:05:54
So I'll go ahead and click on get plan and then the first step we're gonna do here is choose ourMoreSo I'll go ahead and click on get plan and then the first step we're gonna do here is choose our domain name and if you already have a domain. Name a website address you could put that there.
How do I edit the course page in WordPress?
Please connect the edit course page from wp-admin -> course manager -> Connect edit course page . Make sure that you have selected the template of your edit course page “Create content” .
How do I override a LearnDash template?
You can use either of them and can override any template in the child theme. To override the templates: Copy the template into a directory named /learndash in your child theme keeping the same file structure but removing the /templates/ subdirectory.Mar 10, 2021
What is LearnDash focus mode?

NOTE. This feature was introduced in LearnDash 3.0 and works with the new LearnDash 3.0 template. This feature does not work with the Legacy template. Focus Mode aims to eliminate distractions & streamline your user's learning experience – increasing learning retention and completion rates.Apr 5, 2022
Is LearnDash any good?
By far the best thing about LearnDash is its drag-and-drop builder feature. It allows users to visualize the layout of their course as they're building it. This way, you can visualize what your courses are going to look like before they're live, and allows you to connect everything together in real-time.
How do I create an online course website in WordPress?
Let's take a look at how you can create an online course for free using WordPress in seven simple steps:
- Download and Install the LearnPress Plugin.
- Create a New Course.
- Configure the Course Settings.
- Add the Lessons to Your Course.
- Create Quizzes.
- Link the Lessons and Quizzes to the Course.
How do I create an online course website?
How to create an online course
- Choose the right subject matter.
- Test your idea.
- Research the topic extensively.
- Write a course outline.
- Create the course content.
- Bring your course online.
- Sell your online course.
- Market your content.
What is the flexibility of LearnDash?
The flexibility of WordPress and LearnDash means that you have an almost endless number of options available to you. Mix and match techniques, experiment, and choose a method that best fits your overall business model.
What can you put between visitor shortcodes?
Any content you put between the visitor shortcodes will only show to those who have yet to purchase your course. You can include things like sales videos, images, testimonials, and anything else to help explain the course and secure the sale. When someone purchases the course they no longer see this information.
Can you create a sales page on WordPress?
Fortunately the flexibility of WordPress gives you plenty of options for creating high-impact sales pages for your courses. There are actually a number of ways to go about creating a sales page depending on how you are planning to sell your course (i.e. shopping cart, membership plugin, or built-in LearnDash payment system), and what other tools you are currently using.
Can you post a course on WordPress?
This means that you can post course specific sales messages anywhere on your WordPress website, and when someone is enrolled into that course then that message no longer displays . These shortcodes are a great way to personalize the course experience just a little more for your learners.
Setting up the profile page
The first thing you will need to do is to create an account/profile page. This is done by adding the following LearnDash shortcode:
Get creative, but not too creative
Just a word to the wise: don’t get too creative with your login form. It’s not ideal for your users to get confused when accessing the material. Keep it simple but don’t be afraid to really make the forms match your overall brand to create a cohesive experience for users as they access their accounts.
About Justin Ferriman
Justin Ferriman started LearnDash, the WordPress LMS trusted by Fortune 500 companies, major universities, training organizations, and entrepreneurs worldwide for creating (and selling) their online courses. Justin's Homepage | Twitter
What is LearnDash course builder?
The LearnDash course builder provides an easy, intuitive way to build out your courses. You can add new sections, lessons, topics & quizzes without ever leaving the page. This article explains how to use every aspect of the course builder to make creating & editing courses a breeze.
What is section heading in LearnDash?
Section headings (requires LearnDash 3.0+) provide a simple way to break your course into sections. They don’t contain any actual content, and are simply a text-only heading that can be placed between any two lessons. They work in a similar fashion to chapters in a book.
How to add quizzes to a quiz?
There are multiple ways to add existing quizzes. Add a single quiz: Hover over a quiz in the quiz box and click the “Add” button. Add multiple quizzes: Select the checkbox next to multiple quizzes, and then click the “Add Selected” button. Drag & drop: If you’d like to add quizzes in a particular spot within your course, ...
How to add a lesson to a course?
There are multiple ways to add existing lessons. Add a single lesson: Hover over a lesson in the lesson box and click the “Add” button. This will add the lesson to the end of your course. Add multiple lessons: Select the checkbox next to multiple lessons, and then click the “Add Selected” button.
Where to find my lessons?
Your existing lessons can be found in the “Lessons” box in the sidebar. By default, your most recent lessons are shown, but you can click “View all” to see all lessons, or use the search box to find a specific lesson by title.
Can you add quizzes to a course?
Quizzes. Quizzes can be added to lessons & topics, or as a final quiz to the course itself. Any combination of these will work. You can create new quizzes directly from the course builder, or pull in existing quizzes you’ve already created.
How to publish a course on LearnDash?
So go to LearnDash LMS > Courses, choose the course, and click the Edit link. Once there, click on the Publish button on the top right .
How to check license info for LearnDash?
If you are unsure about your license, log into your account on the LearnDash website and click on the License Details link to check your license information. You should have also received the license in your inbox after you purchased the LearnDash plugin.
What is LearnDash LMS?
LearnDash LMS is a comprehensive course platform for your WordPress website. The solution should give you everything you need to create a successful online course.
How to find the design and content elements in WordPress?
In WordPress admin, go to LearnDash LMS > Settings . Under General settings, you can find the Design & Content Elements section:
What is a course builder?
The Course Builder is the heart and soul of LearnDash, a place where you create the section headings, lessons, topics. It’s a place where you can also build Quizzes and Assignments.
How to add more user engagement to a course?
One way to add more user engagement to courses is to have quizzes. They can measure how well a student has learned a particular subject, and they can also act as a way to motivate students.
What is nice about LearnDash?
What’s nice about LearnDash is that you can improve it further with the plethora of add-ons. We already touched on this topic a bit in the previous section with the CourseGrid add-on.
Course Builder Overview
Add Content to Your Course
- There are multiple ways to add content with the course builder. How you go about adding your content will depend on a few things: 1. what type of content you’re adding 2. personal preference IMPORTANT All new content created via the Course Builder (i.e. Lessons, Topics, and Quizzes) is automatically published and set to “Public” once the changes ar...
Rearrange Course Content
- In addition to adding content, you can also use the course builder to rearrange lessons, topics & quizzes. There are two ways to move content around.
Popular Posts:
- 1. which institute is best for medical transcription course in bangalore
- 2. what is financial management course
- 3. what is the best lsat prep course to take
- 4. how to write a college course curriculum
- 5. how long is billing and coding course
- 6. how long is medical assistant course
- 7. what is pmp training course
- 8. what is a course management system
- 9. what is business management course
- 10. how long is hvac course