You can add content in four ways:
- Upload files and folders into Course Files with the drag-and-drop or the browse functions.
- Upload files from your computer when you create content with Browse My Computer.
- Create HTML objects in Course Files and upload files.
- Use WebDAV for direct upload, editing, and management of files in Course Files from your computer desktop or through WebDAV capable applications.
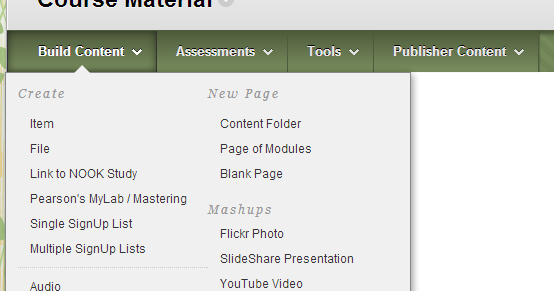
Adding an Item
- Go into a Content area in your course, such as “Course Materials” or “Syllabus.”
- Click on “Build Content.”
- Click on “Item.”
- Enter a name for the “Item” (e.g. “Readings”).
- Type or paste your text into the Text area.
Where is the course content page on Blackboard?
To access the Content Collection in Blackboard, log into your Blackboard course and go to the Control Panel. In the Control Panel, click on Content Collection to view links related to the Content Collection: Click on the Course ID to access the Content Collection for the current course.
How do I create a course content?
Four Steps to Create Course Content that FlowsConsider your goals in teaching this course. Decide what you would like your students to accomplish from taking this course. ... Develop topics and subtopics, then narrow down further. ... Structure the course with what you have finalized. ... Plan your content types.
How do you create course content for an online course?
How to create an online courseChoose the right subject matter.Test your idea.Research the topic extensively.Write a course outline.Create the course content.Bring your course online.Sell your online course.Market your content.More items...•
What is course content?
Any informational material that is required for participation or understanding content such as assigned readings, video recordings, exams, and any other material needed for learning.
What is online course content?
An online course is a set of instructional experiences (lessons or learning activities) delivered through the internet with a specific learning goal. Learning activities vary based on the type of the course: Self-paced, Instruction-led, or Blended.
How do I create an audio course?
How to Create an Audio CourseIdentify Your Target Audience. ... Stick to Evergreen Information. ... Plan Your Content. ... Get Your Recording Gear. ... Record Your Content. ... Record somewhere quiet - Find a quiet enough space to record where there won't be much ambient noise picked up.More items...
How do you conduct an online class?
Online classes typically have an asynchronous, or self-paced, portion. Students complete coursework on their own time but still need to meet weekly deadlines, a format that offers flexibility for students.
What specific steps will you take to ensure you complete the required course work?
manage time over in order to successfully complete an online course:Make the course a priority. ... Take the course with a friend or colleague. ... Set aside one hour a day to work on the course. ... Make a study plan. ... Make a calendar or schedule. ... Get rid of distractors. ... Set goals and incentives.More items...•
What does item mean in Blackboard?
Items indicate if they are hidden from students or not available to students. You can preview hidden or unavailable content in Blackboard Instructor, but students don't see this content in the student app.
Does Blackboard Instructor have activity stream?
Most activity stream information is represented on the app's Course Overview. However, the activity stream itself isn't available in the Blackboard Instructor app. The Blackboard app for students does include the activity stream.
Can you delete Ultra Learning Modules?
For Ultra learning modules in Blackboard Instructor, you can edit the title, visibility, and description. You can also delete Ultra learning modules. To make further changes, access your course on a web browser. Item settings for learning modules aren't available for Original courses.
Can you view learning modules in Blackboard?
You can view learning modules and edit some settings in the app, but you create them in the web browser view of your course. You can require students to complete the content in a sequence or allow students to explore the content in any order. For Ultra courses in the Blackboard Instructor app, you see the same learning module interface ...
Does Blackboard app open in browser?
Most of your course content will display natively in the app. Content that isn't supported generally opens in the in-app web browser. Preview your content and assessments in Blackboard Instructor or obtain a student login to preview content in the Blackboard app for students.
Can you view folders in Blackboard?
Within the app, you can view the folders, documents, assessments, and other items you added in the web browser view of the course. You can preview items in the app to be sure they appear as you intend on mobile devices, but you must create items in Blackboard Learn on a web browser. You can change some settings for course items.
Can you change the settings on Blackboard?
You create all course content in the web browser view of your course, not in Blackboard Instructor. In the app, you can change some settings or delete items. Changes you make in the app are reflected in the web browser view of your course.
Who can make the Courses folder in the Content Collection available to?
Administrators can make the Courses folder in the Content Collection available to instructors, content designers, and students.
What is a course folder?
The course folder may be used as a sandbox for each course's instructors, teaching assistants, and course builders to create and share documentation amongst themselves. Additional permissions do not have to be applied because these roles already have default Full permission for their courses.
How to edit course roles?
To edit these default role designations, go to Content Area Management on the Administrator Panel, Default Folder Creation Settings, and then select Edit in the menu for the /courses folder. Selecting additional course roles grants full permissions to those users. If users such as students should only have read access in an area, the permission must be edited on the Manage Permission folder for that individual course after the course folder has been generated.
What happens if a course ID is not deleted?
As long as the course ID is not deleted, the course folder will appear in the Content Collection. This model allows content to be accessible beyond the timeline of an individual course.
What is a sandbox in a course?
As a sandbox for instructors, teaching assistants, and course builders to create and share documentation amongst themselves, which may be linked to from inside the course for sharing with the course members.
Who has access to course folders?
Administrators should consider who has access to courses folders. By default, the system is set up to give full permission to the instructor, teaching assistants, and course builders. This also means that the folder is generated the first time one of these users opens on the Content Collection tab.
Do content consumers have to be instructors?
If content consumers (instructors) will link to the material directly from their courses, they must be instructors in the courses. Otherwise, they only need read access to view the material, and can first copy the material into their own course folders before linking to it.
How to edit a course page?
To edit the title and settings of a course module page, access the module page title's menu and select Edit. If you change the title, the change does not show on the course menu. You can also edit the title on the course menu for consistency. If you change the title of the course module page on the course menu, the title is changed in the course menu and on the page itself.
How to add modules to a course?
On the course module page, select Add Module. On the Add Module page, you can search by keyword or browse by category to find modules. Select More to view how a module will appear on the page.
How to change how content appears in a module?
Select the Manage Settings icon to change how the content appears. For example, you can select how many days of announcements appear in a module. Select the X to remove a module. Content reported in the module isn't removed. Not all modules have settings you can change.
What is a course module?
Course module pages contain details about new content and due dates for the course you're in. Information is presented in boxes called modules, such as My Announcements, My Tasks, To Do, and What's New. The system generates the information in each module. You can't add your own content to module pages.
What is the home page of a course?
The Home Page is often the default course entry point and it's the first page students see when they enter your course.
Where is the link to the new module page?
After you submit, a link to the new module page appears at the bottom of the course menu. You can drag it to a new location or use the keyboard accessible reordering tool.
Can you edit notifications in Ultra?
Reminder: For your Original courses in the Ultra experience, you won't see the Edit Notifications Settings option in any module. You'll choose which notifications you want from your activity stream's Notification Settings panel.
How to add a file to a course?
Go to the course area where you want to add the file. In the Build Content list, select File.
Where are my files saved in Course Files?
Files you upload with the Browse My Computer function are saved in the top-level folder in Course Files. You don't have the option to select a different folder when you upload a file. By default, all enrolled users are granted read permission for files you upload to your course this way.
How to upload files to hot spot?
Drag files from your computer to the "hot spot" in the Attach Files area. If your browser allows, you can also drag a folder of files. The files will upload individually.
Where is the file uploaded to the content item?
The file uploaded to the content item appears as a link in the content area and is saved in Course Files in the top-level folder. You can move the file to a different folder in Course Files and the link in your course won't break.
Can you drag files to upload on Blackboard?
You won’t be able to drag files to upload if your institution uses an older version of Blackboard Learn.
Can you edit a lesson without uploading it?
Advantage: You can edit any part of the lesson's content and overwrite just the edited file or files without removing and uploading a new zipped file. All links remain intact in your course.
Can you create a collection of files or an entire lesson?
You can create a collection of files or an entire lesson, including cascading style sheets (CSS), zip it into a package, and upload it into Course Files from your computer.
Add content packages to use the content player
One type of web-based learning content you can use in your course is called an SCO, or Shareable Content Object. These SCOs are gathered together into a compressed, zipped file called a content package. The zipped file can be unpackaged and played through a content player.
SCORM content
The SCORM Engine supports content that conforms to the SCORM 1.2 standard, the SCORM 2004 standard, as well as AICC and the playing of Tin Can API packages. Blackboard Learn currently doesn't include a Tin Can Learning Record Store (LRS) however basic data passed will be viewable in the Learn Grade Center.
View SCORM attempt details
When a SCORM package has been set for grading, you can view attempt details related to the users' interactions with the content. The details may include the total time the user has viewed the content, the completion status, responses to any questions contained in the package, and whether the responses were correct.
Edit the SCORM player advanced options
Most of the time, you don't need to access or change the SCORM player Advanced Options because the default settings are set for maximum compatibility and performance. The content package should already have the intended navigation, flow, and behavior, and the default settings are most likely to display it correctly and consistently.
Navigational controls
The Navigational Controls allow you to include buttons, bars, and other navigational aids students will see and be able to use when accessing the course content using the SCORM player.
Launch behavior
The Launch Behavior options control the initial appearance of the content when first launched by students.
Rudimentary sequencing
The Rudimentary Sequencing options enable you to control what should happen next, under both normal and error conditions, when a student either completes or leaves a SCORM Content Package before completion. Based on these settings, the SCORM player determines what should happen next.
What is content container?
In a content container, you create content from menus for content items, tests, assignments, and links to tools. As you create content, you can set its options, such as availability. You can create content and make it unavailable to students until you're ready for them to view it.
Can you make content unavailable to students?
You can create content and make it unavailable to students until you're ready for them to view it. You can also limit which content items students see based on date, time, individual users, course groups, and their performance on graded items. Example: Release an assignment after a test is taken.
Export Files
Supported Content
- When you add documents in the web browser view of a course, be sure the file types are supported by the mobile apps. More on compatible file types Most of your course content will display natively in the app. Content that isn't supported generally opens in the in-app web browser. Preview your content and assessments in Blackboard Instructor or obtain a student login to prev…
Original Courses
- Discussions. Discussions are best accessed from the Course Overview. If you have a link to the discussions tool in the course menu in your Original View Course, it shows in Course Content in the app as well. When students tap a discussion link in Course Content, they're directed to a web view of the discussion outside of the app. More on discussions in the app Course menu tool link…
Ultra Courses
- Activity stream. See an up-to-the-minute list of important course activity including new content, announcements, and grades. The activity stream automatically prioritizes items to help you focus on the tasks that you want to take care of right away. Tap the menu icon to navigate to your courses and other features. More on activity stream
Edit Content Settings in The App
- In the app, you can change some settings or delete items. Changes you make in the app are reflected in the web browser view of your course. 1. Navigate to a course item and select it. 2. You'll access Settings one of these ways: 2.1. Tap the gear icon at the top of the screen. 2.2. Tap the three dots at the top of the screen and select Settings. 3....
Organize Course Content
Use The /Courses Or /Organizations Folders
Use The /Courses Or /Organizations Folders as A Sandbox
Allow Students Selective Access to Course Or Organization Folders
Provide Storage, Workspace, and Access For Content Collections
Create Folders in The Course Content Area
- The course and organization folders use existing IDs (course IDs and organization IDs) to create subfolders. For example, if a course has a course ID of Biology100, the course folder in the Content Collection is automatically named Biology100. Folders cannot be manually added to the courses or organizations top level folders, but subfolders may be ...
Access The Course Content Area
Popular Posts:
- 1. which institute is best for medical transcription course in bangalore
- 2. what is financial management course
- 3. what is the best lsat prep course to take
- 4. how to write a college course curriculum
- 5. how long is billing and coding course
- 6. how long is medical assistant course
- 7. what is pmp training course
- 8. what is a course management system
- 9. what is business management course
- 10. how long is hvac course