Full Answer
How do I add users to a course in learndash?
To enroll a user into a course: Click the course on the left that you’d like to enroll them in; Click the right arrow to move that course into the ‘Already Enrolled’ window; Click the Update Profile button at the bottom of the page; To remove a user from a course: Click the course on the right that they are already enrolled in
What information does learndash store about a user?
There are numerous ways to do it with the course’s settings listed below: Open up – Any person can access the course. It’s public on your site. Cost-free – The course is complimentary, yet, individuals need to register and sign up for it. Acquire Now – …
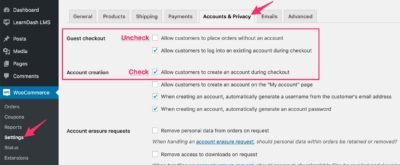
What is the new learndash registration flow?
Crafting Your Course. Learn how to create your first course from scratch. ... Academy. Powered by LearnDash Login Username or Email Address. Password. Remember Me. Lost Your Password? Register Don't have an account? Register one! Register an Account. Username. Email. Password: Confirm Password: YES! I want to be notified of the latest LearnDash ...
How do I integrate learndash with my WordPress website?
LearnDash customer support is an area with combined reviews from LearnDash users. LearnDash has a helpdesk that you can log right into and also utilize at any time. Nonetheless, some users have noticed the good quality of LearnDash customer assistance to be below average or …
How do I create a course on LearnDash?
Creating Your First Course?Navigate to LEARNDASH LMS > COURSES.Click the “Add New” button at the top of the page.Click the “Builder” tab in the top navigation bar.Apr 6, 2022
How do I add a user to a LearnDash course?
Enroll One User into a Course or CoursesNavigate to Users > All Users.Click on the person's username to access their WordPress profile.Scroll down to the User Enrolled in Courses section.You should see two columns: “Search All Courses” and “Search Enrolled Courses”More items...•Jan 7, 2019
How do I access my LearnDash course?
Locating Course Access SettingsNavigate to LEARNDASH LMS > COURSES.Click on the course you want to edit.Click on the Settings tab at the top of the page.Locate the section titled “Course Access Settings”Apr 5, 2022
How do I add an instructor on LearnDash?
To create an instructor, simply create a new user (or edit an existing one) from your USERS menu and set their role to “Instructor”. Now when this user logs into your site they will be presented with a custom admin panel where they can begin creating their own courses.
How do I manage users in LearnDash?
User Enrolled in CoursesClick the course on the left that you'd like to enroll them in.Click the right arrow to move that course into the 'Already Enrolled' window.Click the Update Profile button at the bottom of the page.Feb 20, 2022
How do I use LearnDash course grid?
The LearnDash Course Grid add-on can be used to display your courses in a grid format....BlockMake sure the “LearnDash Course Grid” plugin is installed & activated.Click the + icon to add a new block.Search for “LearnDash Course Grid” & click on the block to insert it.Adjust your settings in the Block options panel.Apr 6, 2022
How do I find my LearnDash course ID?
How do I find the course ID?Navigate to LEARNDASH LMS > COURSES.Hover over the course in which you need the ID.Look at the bottom of your browser for a URL.The number after the post= part of the URL is the course ID.Mar 29, 2021
How do I use LearnDash pro panel?
0:4330:29ProPanel and LearnDash - YouTubeYouTubeStart of suggested clipEnd of suggested clipExperience. So what is pro panel pro panel uh pretty much just gives you an easy way to look at allMoreExperience. So what is pro panel pro panel uh pretty much just gives you an easy way to look at all your data from your students progress and courses and lessons.
How do I use drip content in LearnDash?
Simply click on the user's name, select the course you want to add them to (or remove them from), and click UPDATE. Done deal – all is good to go 🙂 … Oh, and if your lessons are drip-fed, then the drip-feeding schedule will begin right after enrollment.
How do I add an instructor to WordPress?
In order to do this, please go to your WP-Admin > Users > Search for the user and Edit > In the Edit User window, under the Role drop-down field, choose Instructor > Save. After that, the user's role will be changed to Instructor and your instructor will be able to add courses.
What are the different WordPress roles?
WordPress has six pre-defined roles: Super Admin, Administrator, Editor, Author, Contributor and Subscriber. Each role is allowed to perform a set of tasks called Capabilities.
What is LearnDash in WordPress?
LearnDash uses WordPress’ built-in user management system. When a user enrolls in a LearnDash course, becomes a group leader, or any other action associated with LearnDash, that information is stored in the user’s WordPress profile.
How to remove a user from a course?
To remove a user from a course: Click the course on the right that they are already enrolled in. Click the left arrow to remove that course from the ‘Already Enrolled’ window. Click the Update Profile button at the bottom of the page.
What is a LearnDash?
The date & time that a user enrolls into a course is captured and stored by LearnDash. This can be used to limit course access to a certain number of days, or drip feed lessons at a specified interval, starting from the date the user enrolls.
What is the Subscriber role in LearnDash?
When someone enrolls into a course, LearnDash assigns them the “Subscriber” role. This is one of the default roles used by WordPress. There are a few things to keep in mind with user roles:
How to access a user's profile on LearnDash?
To access a user’s profile: From the USERS > ALL USERS page…. Click on the username of the user you’d like to view. The first information you’ll see is general, personal information about the user. Scroll down to view the additional sections that LearnDash adds to the user profile.
How to mark a course as complete?
As an administrator, you can mark any course step as either complete or incomplete, simply by using the checkboxes. Click the “ (details)” link to view course steps. (optional) Use the arrows on the left to view topics/quizzes beneath a lesson. Check or uncheck a box next to any lesson, topic or quiz.
Can you manage users on LearnDash?
Because LearnDash leverages WordPress’ existing user management system, you can manage users (aka: students) entirely from their user profile in the WordPress admin area. This article will explain the various user data that LearnDash collects, where to find it, and how to update it.
How to enroll a user in a course?
Enroll One User into a Course or Courses 1 Navigate to Users > All Users 2 Click on the person’s username to access their WordPress profile 3 Scroll down to the User Enrolled in Coursessection 4 You should see two columns: “Search All Courses” and “Search Enrolled Courses” 5 In the Search All Coursescolumn, click the course you want to enroll the user in 6 Now click the arrow to move that course to the Enrolled Coursescolumn 7 Be sure to click the Update User button when you’re finished
How many users can you enroll into a course?
Enroll one user into a course(s), or. Enroll many users into one course (in bulk) Enroll One User into a Course or Courses. If you only need to enroll one or two individual users into a course or set of courses, this will be your best option.
How to create a course on LearnDash?
This 10 video series covers the most common steps when creating an online course with LearnDash. The videos are narrated by Joe Casabona, a WordPress expert and user of LearnDash. The videos are as follows: 1 An Introduction to LearnDash 2 Creating Courses 3 Adding Lessons to Courses 4 Adding Topics to Lessons 5 Evaluating Students with Quizzes 6 Using WooCommerce with LearnDash 7 Processing Payments with Stripe 8 Custom Login Pages with the Uncanny Toolkit 9 Custom Login Pages with Theme My Login 10 Creating a Course Grid
Who is Justin Ferriman?
Justin Ferriman is the co-founder and CEO of LearnDash, the WordPress LMS trusted by Fortune 500 companies, major universities, training organizations, and entrepreneurs worldwide for creating (and selling) their online courses. Justin's Homepage | Twitter
Is software good?
The reality is that software is great but everyone will have questions at some point. Maybe it is with regards to a particular setting, or perhaps about the best way to go about configuring a course. Sure someone can tell you how to do it but seeing it done can go a long way.
Who narrates LearnDash?
This 10 video series covers the most common steps when creating an online course with LearnDash. The videos are narrated by Joe Casabona, a WordPress expert and user of LearnDash. The videos are as follows:
Creating and Managing a Group
This section explains everything that you can do with LearnDash groups (memberships) — customize settings, add content, control and sell access, report and more.
Groups Use-Cases
You are a teacher and you want to divide up students into classes so that you can track them independently from one another
Popular Posts:
- 1. which institute is best for medical transcription course in bangalore
- 2. what is financial management course
- 3. what is the best lsat prep course to take
- 4. how to write a college course curriculum
- 5. how long is billing and coding course
- 6. how long is medical assistant course
- 7. what is pmp training course
- 8. what is a course management system
- 9. what is business management course
- 10. how long is hvac course